
Assign an existing Transformation to a datamart star
Introduction
Use the Stars grid to assign an existing Transformation to a datamart star and name its analytical output. A Datamart transformation is based on an existing Transformation and supports analytical facts and dimensions. This lets you reuse a working definition for the output required by your reporting design.
This how-to covers reviewing the base Transformation, entering the star assignment, saving it, and checking the saved definition and assigned output. Database creation and data validation require separate checks; saving an assignment alone does not establish that analytical data is available.
The screenshots illustrate navigation and how settings can be changed. Use the objects, names, schemas, and settings required by your Data Warehouse (DWH) project. Pictured checkbox states are examples, not required choices.
Applicability
Use this workflow when the base Transformation and target Star already exist. It covers assignment through the Transformation editor. If you need to create the base Transformation and its datamart output together, use the Create and save a Regular transformation.
The steps use the AnalyticsCreator desktop interface shown in the captures. No product version restriction is established for this page.
Prerequisites
3.1. An open Data Warehouse (DWH) project that you can edit, with a known target database.
3.2. A working base Transformation with the inputs, output columns, joins, filters, and historization needed for the intended analytical output.
3.3. An existing target Star, its schema, and an output name that follows your project's naming convention. A new assignment needs a name that does not conflict with an existing output.
3.4. A defined fact or dimension role, the required keys, and the reporting grain—what one output row represents. If the task includes changing role settings or adding an assignment filter, the intended configuration and complete filter expression must be known.
3.5. The project's Transformations Createviews value and intended save-time database behavior. This setting controls view creation when saving a Transformation: 0 = No, 1 = Compile only, and 2 = Yes. Saving may therefore compile or create a view.
Steps
Open ETL
In the intended Data Warehouse (DWH) project, click ETL on the toolbar. This tab provides access to package, script, Import, Historization, and Transformation workflows.

Open the Transformation list
Click Transformations in the ETL toolbar to open the list of existing Transformation definitions.

Open the intended base Transformation
Identify the Transformation by its Name and Schema, then double-click its row. If you need to narrow the list, enter its name in Search criteria and click Search.
Choose the working Transformation that produces the data needed by your reporting design. DIM_Calendar in schema DWH is the screenshot example; neither identifier is required for your assignment.

Check the base definition
In the editor, confirm Name and Schema. On Definition, review the existing input tables, output columns, joins, filters, and expressions against the intended output. Select VIEW to inspect the query, then return to Definition for the star assignment.
Use these explanations to review the working definition:
- TransType — The Transformation type. A Regular transformation defines its logic through configured inputs, joins, columns, filters, and references. Retain the base type; the star assignment creates a separate Datamart transformation.
- Hist Type / FullHist — The historization setting. FullHist includes the complete available record history and requires a historical surrogate key and validity start and end fields. Retain the history strategy required by your output.
- SATZ_ID / DAT_VON_HIST / DAT_BIS_HIST — Example identifiers for the historical surrogate key, validity start, and validity end. If the base uses FullHist, check that its output exposes the corresponding fields using your project's names and mappings.
- Data Warehouse (DWH) / pictured DIM_ prefix — The Data Warehouse (DWH) project contains the definitions being edited. In the screenshots,
DWHis also a literal schema name andDIM_is an example Dimension naming prefix. A Dimension represents descriptive business data prepared for analytical use; its name alone does not configure that role. - Columns / Tables / Reference / Statement — Columns and Tables contain the output and input definitions. In the Columns grid, Reference identifies a source-field mapping and Statement contains an expression. Review the existing mappings and expressions needed for your output.
- SeqNr / TableSeqNr / PK Position / IsAggr. — Additional labels in the Columns grid. Preserve the existing values in the working base Transformation; changing them is not part of assigning it to a Star.
If the base does not yet produce the required data, complete its setup before adding the assignment. See Create and save a Regular transformation or Create and save a Manual transformation.

Assign the Star and output name
On Definition, locate Stars to the right of the Columns grid. A Star groups analytical facts and dimensions. In a new row, select the existing target Star and enter the intended View name, which names the datamart output for this assignment. If the intended assignment already exists, review that row instead of adding a duplicate.
Naming example: a calendar Transformation can have separate assignments named DIM_StartDate and DIM_EndDate when the reporting design needs both date roles. Use distinct names for those separate outputs. DIM_ is literal prefix text; these names contain no placeholders.
Check the selected Star and View name against the target schema and naming convention from your prerequisites. Review the row's role and filter settings in Review role and filter settings before saving.
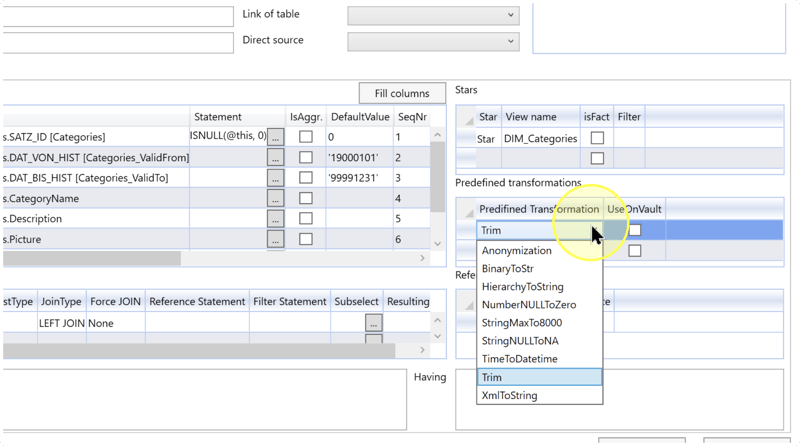
Review role and filter settings
Review the Stars row's isFact checkbox and the separate Fact transformation checkbox against your intended analytical output. A Fact represents measurable business events, balances, or transactions; a Dimension represents descriptive business data used to analyze them.
isFact is a role setting in the individual Stars assignment. Fact transformation is a separate setting on the base Transformation. The highlighted checkbox illustrates how a setting can be changed; it does not require changing every base Transformation or copying the pictured state.
If your task includes a role change, select or clear the relevant checkbox according to the established fact or dimension configuration for your project. Otherwise, retain the working configuration. Review both values independently; do not assume changing one also changes the other.
If an assignment needs to restrict its output, enter the complete expression specified for it in the Stars row's Filter. For a new assignment that needs no restriction, leave that field blank. For an existing assignment, retain its filter unless the output requirements call for a change. The Stars Filter and the base Transformation's Filter are separate fields.

Review and save the assignment
4.7.1. Check the base Transformation, target Star, View name, role settings, and any assignment Filter against your intended output.
4.7.2. Confirm the target database and Transformations Createviews value before saving: 0 = No view creation, 1 = Compile only, and 2 = Yes to view creation on save.
4.7.3. Click Save. If a validation or database message appears, use its details to correct the affected definition or configuration before continuing to Verify the saved assignment and output.

Verify the saved assignment and output
4.8.1. Click ETL, then Transformations, and reopen the base Transformation. Check that the intended Star, View name, isFact, and Filter values remain in Stars, and that Fact transformation retains its intended value.
4.8.2. Return to the Transformation list. Enter the assigned View name in Search criteria and click Search. Locate the output and check its schema against the target Star. Open it and review its definition and VIEW query against the intended base Transformation, fields, history strategy, and analytical role.
4.8.3. Use Expected Results, to assess the assignment. If the database object must also be created, follow the project's database-generation workflow and the checks in Transformation.
Expected Results
5.1. Reopening the base Transformation shows the intended Stars assignment with its saved output name, role setting, and filter. The base Transformation's separate role setting matches the intended configuration.
5.2. The assigned Datamart transformation can be located by its actual name in the target Star's schema. Its definition and query correspond to the intended base data, output fields, keys, history strategy, and fact or dimension role.
5.3. Database creation, query results, and data loading are verified separately when required by the project. A saved definition or visible output name alone does not demonstrate that the database object exists or that its data matches the required reporting grain.
Decisions and variations
Existing base or new base
Use Stars for an existing working Transformation. When you need a new base and its datamart output together, use Create and save a Regular transformation and select the intended Star in the wizard.
Separate analytical roles
Add separate assignments when the reporting design needs separately named outputs from the same base, such as the start-date and end-date examples in Assign the Star and output name. Review each assignment's role and filter using Review role and filter settings. A naming prefix does not set its analytical role.
Assignment or database creation
Saving records the assignment and may compile or create a view according to Transformations Createviews. Create in DWH is a separate database-creation action. If you also need a database object, confirm the project's generation workflow and target object before using that action; see Transformation.
Troubleshooting
- No assigned output is found — Reopen the base definition and check the saved Star and View name. Search for that actual output name and check the target Star's schema. If Save reported a problem, correct the reported issue before saving again.
- Role differs from the design — Compare isFact and Fact transformation with the intended base-and-output configuration. Correct the relevant setting, save, and recheck the output. The screenshot's checkbox state is not a required configuration.
- Database result is missing — Check the target database and Transformations Createviews value. With 0 or 1, saving does not create a view. Follow the project's generation workflow when creation is required, and check any generation message. Verify the resulting object and data separately.
