
Configure historization columns, filters, variables, and scripts
Introduction
Use the Historization editor to configure how an existing historization handles changes to source columns, compares records, and applies calculations, variables, filters, and scripts. Historization preserves data over time so that previous values can remain available for reporting.
This how-to takes you from locating the definition in your Data Warehouse (DWH) project to saving and reopening it to check the intended settings. Change the parts required by your task; calculations, filters, variables, and scripts are needed only when your design uses them.
Screenshot examples: object names, package names, values, and selected settings illustrate the interface. Use your own source, target, and configuration. The empty grids and script boxes in the captures do not demonstrate a populated configuration or an executed data load.
Applicability
This how-to applies to editing an existing historization through ETL → Historizations in the AnalyticsCreator desktop interface. It covers column policies and the related definition, filter, and script settings. Creating a historization is covered in Create a historization with Historization Wizard.
The interface shown uses Automatically created for Stored procedure type. Editing a manually maintained historization procedure is a separate task. The captures do not identify a product version; check the matching interface documentation if your editor differs.
Prerequisites
3.1. An open Data Warehouse (DWH) project containing the historization you need to edit, with its source table or transformation, target table, and package already defined.
3.2. A source with a defined primary key when the task requires detecting changed records. The primary key identifies the corresponding records across loads. Without it, the historization can insert new rows but cannot detect changes.
3.3. Requirements for each column's change policy and for missing records. You must know whether the input is a full load containing all relevant records or a partial load containing only a subset, such as recent changes.
3.4. For any calculation, variable, filter, validity-date expression, or script you intend to add, a complete expression or statement and the required names, data types, and values for your project. For variables supplied through package configuration, the corresponding configuration must already be available.
Steps
Open the ETL ribbon
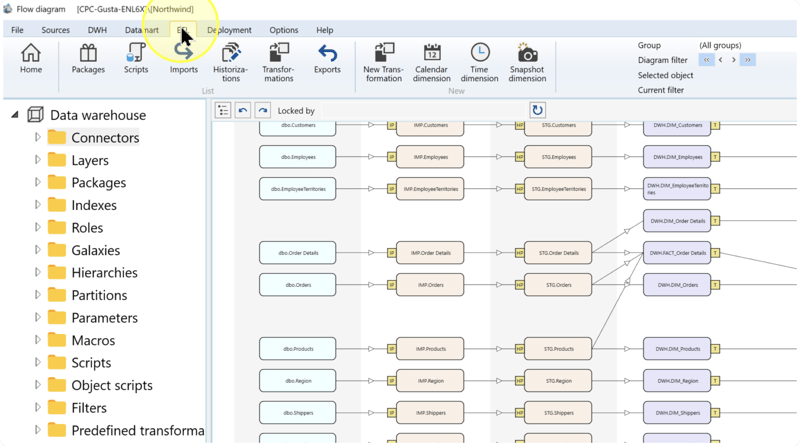
In the intended Data Warehouse (DWH) project, click ETL on the toolbar. This tab gives access to processing workflows, including historizations.
Open the Historizations list
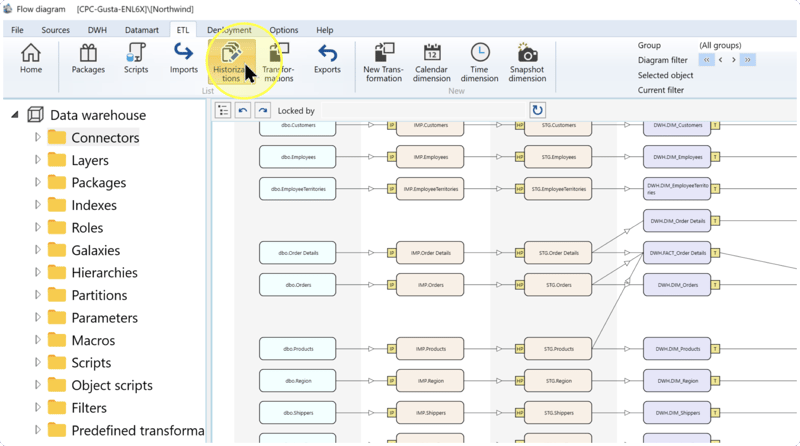
Click Historizations in the ribbon. The list displays historization package items and their load behavior.
Locate and open the intended historization
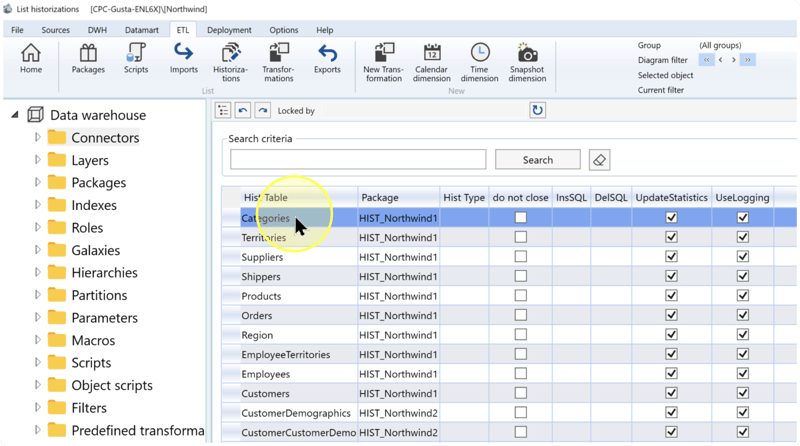
In the list, identify the required row by its Hist Table and Package columns. If you need to narrow the list, enter the intended name in Search criteria and click Search. Double-click the required row to open its editor.
Example: the capture selects Categories in HIST_Northwind1. Select the table and package required by your task.
Configure column policies, calculations, and variables
In the editor, check Historicize for the intended source-to-target pair and Package for its package assignment. In the example, IMP.Categories->STG.Categories connects the Staging Layer (IMP) to the Persisted Staging Layer (STG); these are example schema and object names. A historization is represented by the HP marker in the diagram.
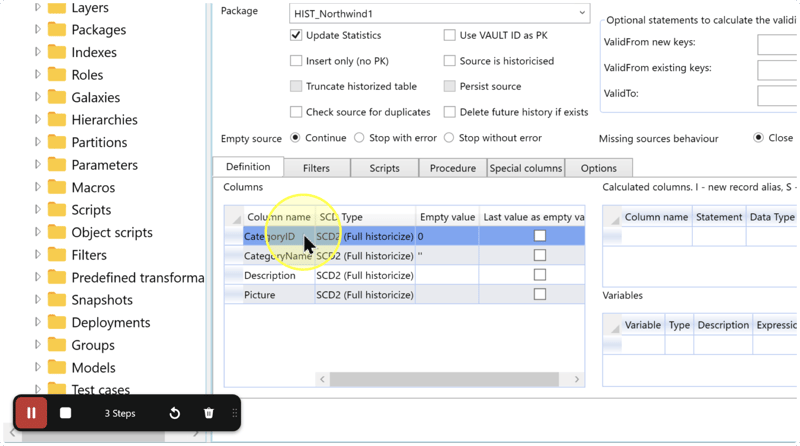
Select Definition. The Columns grid is on the left; Calculated columns and Variables are on the right. Work through the applicable settings below.
Columns: SCD Type — For each column you intend to change, select its change policy in SCD Type. Slowly Changing Dimension (SCD) policies determine how changes to that column affect the historized record.
Select SCD2 (Full historicize) when previous values must remain available: a change closes the current row's validity period and adds a new current row. Use the SCD1 policy when the current row's value should be updated without creating a new version for that change. Use the SCD0 policy when changes to that column should be ignored. Review each column individually; the SCD2 selections in the screenshot are examples.
Empty value / Last value as empty value — Configure these settings when Missing sources behaviour is to use Add empty record, which adds a special record for a missing source key. For each affected column, enter the required value in Empty value, or select Last value as empty value to reuse its previous historical value. Clear that checkbox when the column must use your specified empty-record value instead.
These settings describe values in that special record, not general handling of
NULLin every row. If the design uses another missing-record policy, leave these settings unchanged. Review the policy in Set missing-record behavior and review validity dates before saving.Calculated columns — If the historization needs a calculated output, enter its Column name and complete Statement in this grid and select the required Data Type. In this grid's expressions,
Iis the new-record alias andSis the old-record alias.Calculation example:
ISNULL(I.Value, 0) - ISNULL(S.Value, 0)subtracts the old value from the new value, treating either missing value as zero. Use this only when the actual numeric column and the calculation match your design;Valueis an example identifier. Check that the selected output type can represent the result. If no calculated output is needed, retain the existing grid contents.Variables — If a filter or other configured expression uses a variable, define it in the Variables grid before using it. Enter its name in Variable and select its Type. These are SQL Server Integration Services (SSIS) variables. If the value is calculated by an SSIS expression, enter that expression in Expression; if package configuration supplies it, confirm the corresponding value in
CFG.SSIS_CONFIGURATION.Variable example:
Timestampcan supply the cutoff used byModifyDate > @Timestamp. The definition name isTimestamp; the filter refers to@Timestamp. Supply a type and value compatible with your date column. The screenshot's empty grid does not supply those values. Leave existing variables unchanged when your task does not require a change.
Check: each edited column has the intended policy, every added calculation has a name and output type, and each referenced variable has a defined value source.
Set missing-record behavior and review validity dates
Above the tabs, review Empty source and Missing sources behaviour separately. An entirely empty input and an individual key missing from the input require different decisions.
For Empty source, select Continue when processing should continue with an empty input; select Stop with error when an empty input should be treated as an error; or select Stop without error when the operation should stop without reporting an error. If continuing, also check what the missing-record policy should do with previously historized records.
For Missing sources behaviour, select the policy that matches the meaning of a missing key:
- Close — Closes the existing historical row's validity period. Use this when the input contains the full relevant set of records and absence means that the record has been removed.
- Do not close — Leaves the existing historical row unchanged. Use this for partial or delta input when absence does not establish deletion. This choice does not detect records deleted from the original source.
- Add empty record — Adds a special empty record for the missing key. Use it when the design requires that representation, and configure each column's Empty value or Last value as empty value in Definition, as described in Configure column policies, calculations, and variables.
If a partial load still needs deletion detection within a known subset, define that comparison scope in Filters in Enter filters for the intended comparison. Do not treat records outside that subset as deleted merely because they are absent from the current input.
ValidFrom new keys / ValidFrom existing keys / ValidTo — When validity must use source dates instead of the technical historization date, enter the required source field or complete date expression in the corresponding field. ValidFrom new keys supplies the start date for new rows; ValidFrom existing keys supplies it for changed rows. ValidTo supplies the end date for deleted rows when taking over history from an already historized source.
Check that each expression returns the intended date and matches the source's time policy. If the task does not change validity dates, preserve the existing fields, including blank fields. These fields do not by themselves establish that the source has historical data.
Check: the missing-record policy and any validity-date expressions match the actual completeness and time meaning of the input. The screenshots' Continue, Close, and blank validity fields are illustrative selections.
Enter filters for the intended comparison
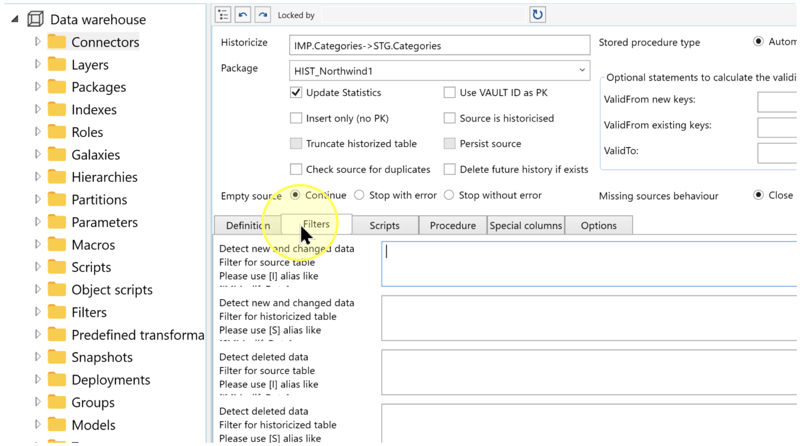
Select Filters. Before entering an expression, identify which comparison it affects and which table it restricts.
- Filters — The screen separates Detect new and changed data from Detect deleted data. Each has a Filter for source table and a Filter for historized table. Source-table filters use the alias
[I]; historized-table filters use[S].
| Setting | Explanation |
|---|---|
| Detect new and changed data — Filter for source table | Restricts source records considered in the new/changed comparison. Refer to source columns with [I], for example [I].[ModifyDate]. |
| Detect new and changed data — Filter for historized table | Restricts historical records considered in that comparison. Refer to historical columns with [S], for example [S].[ModifyDate]. |
| Detect deleted data — Filter for source table | Restricts the source side of the comparison used to identify missing records. Use [I] for source columns. |
| Detect deleted data — Filter for historized table | Restricts the historical records considered for deletion detection. Use [S] for historical columns. With partial input, check that historical records outside the available source range are excluded from deletion detection. |
Enter the complete project expression in the required box. If you are changing a comparison range, review both sides of that comparison and the missing-record policy together. Preserve filters that are outside the intended change, and leave unused boxes blank.
Filter example: ModifyDate > @Timestamp restricts a comparison to dates later than the configured cutoff. When adapting it, qualify the column for the chosen box, such as [I].[ModifyDate] > @Timestamp on the source side or [S].[ModifyDate] > @Timestamp on the historical side. Use your actual date column and the variable defined in Configure column policies, calculations, and variables. This example illustrates the expression; it is not a complete deletion-detection configuration for every partial load.
Check: the expression is in the correct comparison and table box, its aliases and variables resolve, and its range matches the intended records. Entering a filter changes the definition; it does not retrieve or historize data.
Configure the required stage scripts
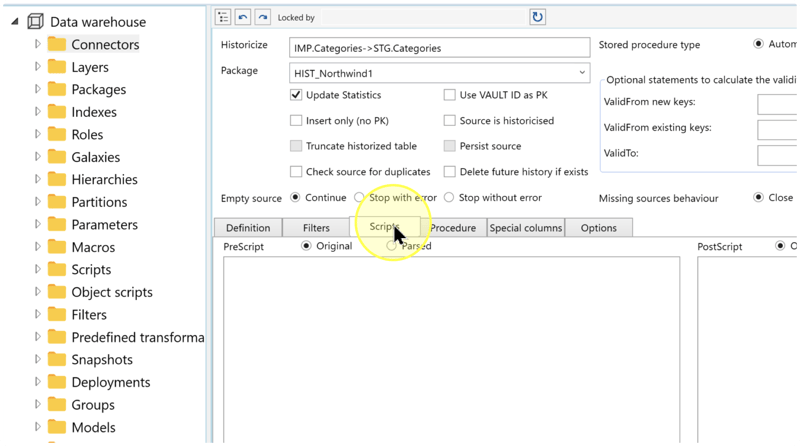
Select Scripts. If SQL must run before the historization operation, select Original for PreScript and enter the complete statement in that box. If SQL must run after the operation, enter it in PostScript with Original selected for that script. Keep an unused script box empty, and retain existing scripts that your task does not change.
Check each statement's object names and intended effect. Where the script uses macros or variables, select Parsed to inspect the resulting text, then return to Original if you need to edit the statement. Inspecting this view does not execute or test the script.
Review and save the definition
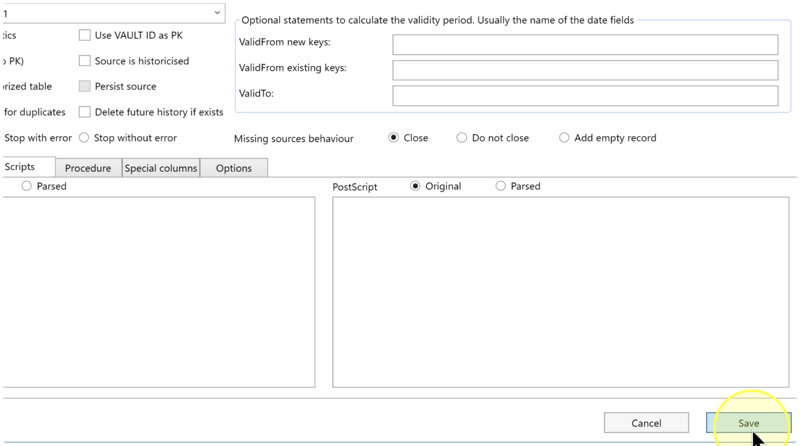
Review Historicize, Package, the column policies, empty-record settings, calculated columns, variables, validity dates, filters, and scripts against the changes you intended. Check missing-record behavior against the input range once more, then click Save.
If a save error is reported, correct the identified issue and click Save again. A closed editor alone is not a persistence check; reopen the definition in the next step.
Reopen and check the saved settings
Return to ETL → Historizations. Locate the same Hist Table and Package row and double-click it. Confirm the source-to-target pair in Historicize, then compare the saved Definition, Filters, Scripts, and settings above the tabs with your intended configuration.
Expected Results: the intended values remain in the same definition when reopened. If a value differs, use Troubleshooting before treating the change as complete.
Expected Results
5.1. The reopened historization identifies the intended source, target, and package.
5.2. Each changed column retains its intended SCD policy and empty-record settings. Added calculated columns retain their names, statements, and output types; variables retain the intended definitions and value expressions.
5.3. The saved filters, validity-date expressions, missing-record policy, and stage scripts match the intended input range and processing requirements.
These checks verify the saved definition. Execution, deployment, and data loading are separate activities. During a subsequent development run, representative new, changed, unchanged, and missing keys need to be checked against the configured policies before accepting the resulting historical data.
Decisions and variations
6.1 Column history. Use SCD2 for retained versions, SCD1 for an update to the current value, or SCD0 to ignore changes to a column. Different columns may need different policies; see Configure column policies, calculations, and variables.
6.2 Full or partial input. A full input can support closing records that are missing from it. Partial input requires either leaving missing records unchanged or defining a deletion-comparison range that excludes records absent only because of the partial load. Review the choices in Set missing-record behavior and review validity dates and Enter filters for the intended comparison.
6.3 Empty records and source dates. Choose Add empty record only when a special record is part of the design. Set validity-date expressions when the source's dates must determine the historical validity period. Both decisions are explained in Set missing-record behavior and review validity dates.
6.4 Calculations, variables, and scripts. Configure these when the task requires a calculated output, a parameterized expression, or SQL before or after historization. A variable may receive its value from package configuration or an SSIS expression; a script belongs in the box for its required stage.
Troubleshooting
- Object not found — Check the current Data Warehouse (DWH) project and the intended target table and package. If Search criteria contains an unintended restriction, remove that text and click Search again. Select the required definition by Hist Table and Package.
- Configuration differs after reopening — Confirm that you reopened the same source-to-target pair and package. Re-enter the intended changes, click Save, and address any reported save error. Repeat the check in Reopen and check the saved settings.
- Runtime result differs — For unexpected closures, compare the actual input range with Missing sources behaviour and both deletion-filter boxes. For unexpected value changes, inspect the affected column's SCD Type. For expression problems, check column names, the required aliases, and variable types and values. For unexpected validity periods, compare the source dates with the configured validity expressions. Correct the relevant definition and verify it in the project's development execution workflow; saving alone does not validate the loaded data.
