
Create and save a Manual transformation
Introduction
Manual transformation is a Transformation type whose output is defined through manually maintained SQL or view text. You maintain the query instead of having AnalyticsCreator compose its logic from regular-transformation settings. A view is a named database query.
Use these steps when you need a custom view definition in your Data Warehouse (DWH) project. This route creates a Regular transformation as a starting definition, then switches to Manual so that you can review and maintain its SQL. Choose inputs and settings for your task. The calendar query below is an example, not a required source or result.
Expected Results: you can reopen the new Transformation, confirm TransType (Transformation type) = Manual, and read back the saved SQL with the intended output column names. Saving the definition is not evidence that a database view has been deployed or that data has been loaded; deployment and execution are outside these steps.
Screenshot examples: names, selected rows, field names, schema values, dates, and checkbox states shown in images are illustrative, not requirements. Choose the objects and settings needed by your Data Warehouse (DWH) project. Exact interface labels, supported syntax, and functional requirements still apply. The examples show how settings or expressions work; you do not need to reproduce their data.
Applicability
These steps describe the supplied desktop interface and demonstrate a SQL Server view-editing workflow. They use a newly created Transformation, not an existing production object. The outcome is a saved manual view definition. History, related inputs, persistence, and Star assignments must follow your design; package execution and deployment are separate tasks.
Interface scope: the screenshots do not identify an AnalyticsCreator version. If your controls or wizard pages differ, check the documentation for your installed version. A separate Manual choice exists in the wizard; it is not the regular-starting-definition route shown here. See Decisions and variations.
Prerequisites
3.1. An open development Data Warehouse (DWH) project that you can edit, with an agreed target layer, schema, and database.
3.2. Existing input objects with verified technical schema, object, and column names, data types, and history status. A display name does not establish a database identifier. DWH.DIM_Calendar, Date, and Year are needed only if you use the calendar example.
3.3. A new Transformation name not already in use in the target schema. Manual_Calendar and Manual Transformation are illustrative names.
3.4. A reviewed SQL Server view query, with the required inputs, expressions, output column names, and dependencies identified. You need enough SQL knowledge to maintain its complete CREATE VIEW statement.
3.5. Agreed settings for history, unknown members, persistence, related inputs, predefined rules, and Star assignments. For a historized or multi-input design, have its history-join strategy and dependency configuration available before starting.
3.6. A confirmed value for the project's Transformations Createviews setting and approval for its effect on the target database: 0 = No, 1 = Compile only, and 2 = Yes. Saving can compile or create a view; it is not necessarily a metadata-only action.
Steps
Open the ETL ribbon
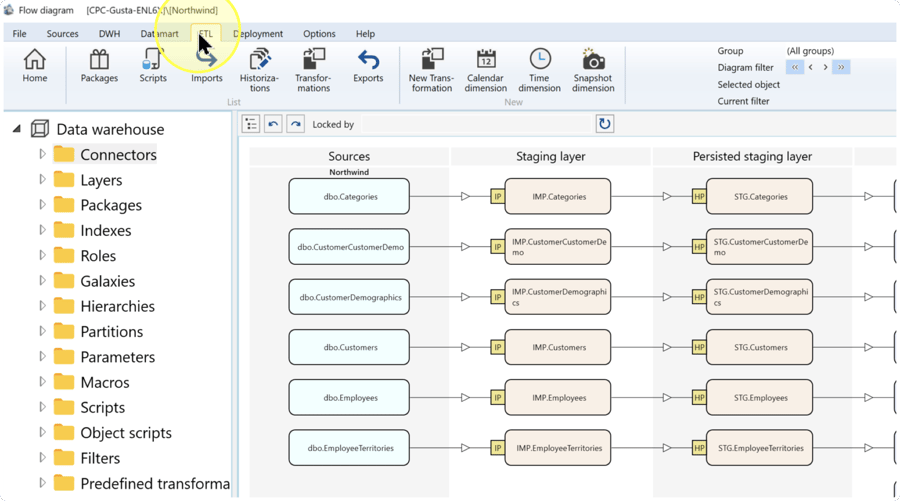
In the top menu bar, click ETL. This toolbar tab provides commands for packages, scripts, Imports, Historizations, Transformations, and new dimensions.
Expected Results: the ETL ribbon is visible.
Start the Transformation Wizard
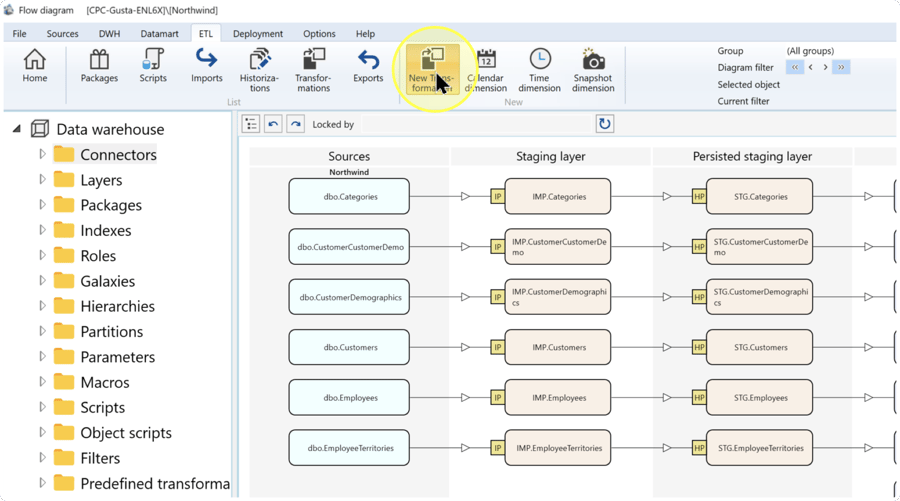
In the New group, click New Transformation. The Transformation Wizard opens.
Expected Results: the Transformation Wizard opens.
Select the starting Transformation type
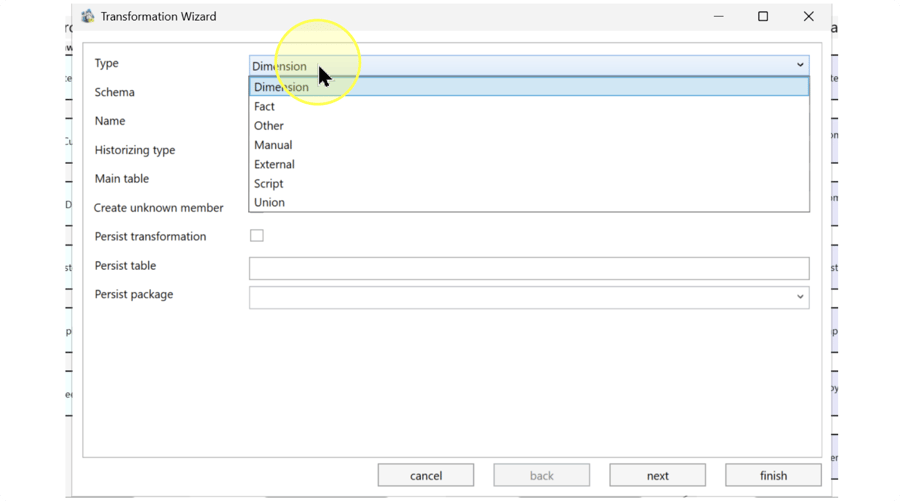
In Type, choose Dimension, Fact, or Other according to the generated starting definition you need. These follow the regular-transformation route used here. You will switch to Manual in Switch the new Transformation to Manual. Do not select Manual in this wizard when following the route below; its later regular-transformation settings do not describe that separate choice.
The first wizard page sets the starting category, target schema and name, main input, and persistence settings. The wizard's Type list is not the same as the editor's TransType list:
- Dimension – A regular starting choice for descriptive business data prepared for analytical use. Select it when that is the required output; the pictured selection is not mandatory.
- Fact – A regular starting choice for measurable business events, balances, or transactions prepared for analytical use.
- Other – another Regular transformation, rather than a dimension or fact starting choice.
- Manual – a manually maintained view. Choosing it at this point follows a different wizard route from the one illustrated here.
- External – Transformation work maintained in an external SQL Server Integration Services (SSIS) package, using Microsoft's data-integration tooling.
- Script – Transformation work defined through a script rather than this view-editing walkthrough.
- Union – a Transformation combining compatible inputs through a UNION view.
Expected Results: Type shows the regular starting category required by your design.
Set the schema and name
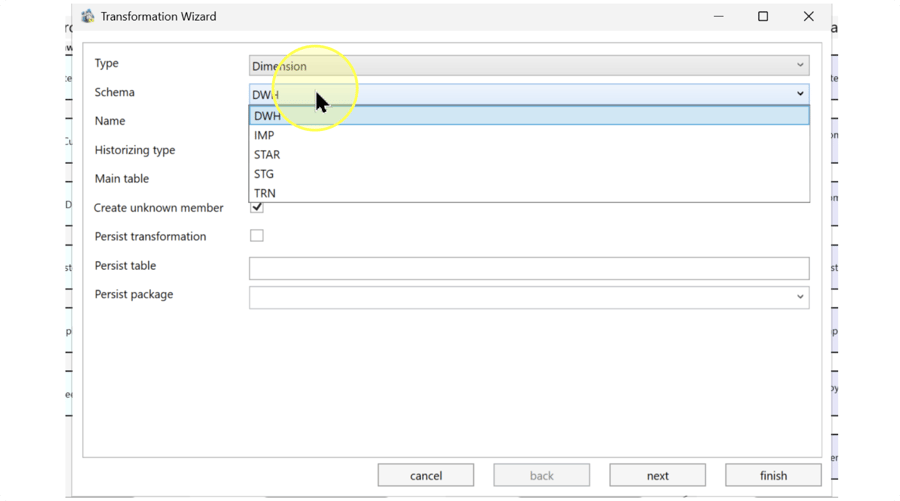
Select the approved target Schema and enter an unused Name. Use those same technical identifiers in the manual view statement later; no name from the screenshot is required.
- Schema – the namespace that groups the Transformation with other objects. Select the schema approved for this Transformation; do not move it to another layer just because that schema is visible.
- Name – the Transformation's technical name. Use the same schema and name in the manual view statement later.
Naming example: a Transformation named Manual_Calendar in schema DWH would use CREATE VIEW [DWH].[Manual_Calendar] AS. This demonstrates agreement between the editor and SQL header; it is not a renaming instruction.
The screenshot includes schema identifiers IMP, STG, TRN, and STAR. The layer terms Staging Layer (IMP), Persisted Staging Layer (STG), and Transformation Layer (TRN) describe architectural roles; a schema identifier must still be checked against your project's layer assignments.
Expected Results: Schema and Name match the values you will use throughout these steps.
Choose the starting history strategy
Review Historizing type against the input's history status. For a non-historized input that needs no historical output, select None. For a historized input, use the previously agreed history strategy; do not choose None merely because it is pictured.
This setting governs history handling when a Regular transformation's main input is historized. Historical output also depends on the query and join logic. After switching to Manual, check that your SQL implements the required behavior; changing a history setting alone is not a substitute for maintaining that SQL.
Expected Results: Historizing type matches the chosen input and history strategy.
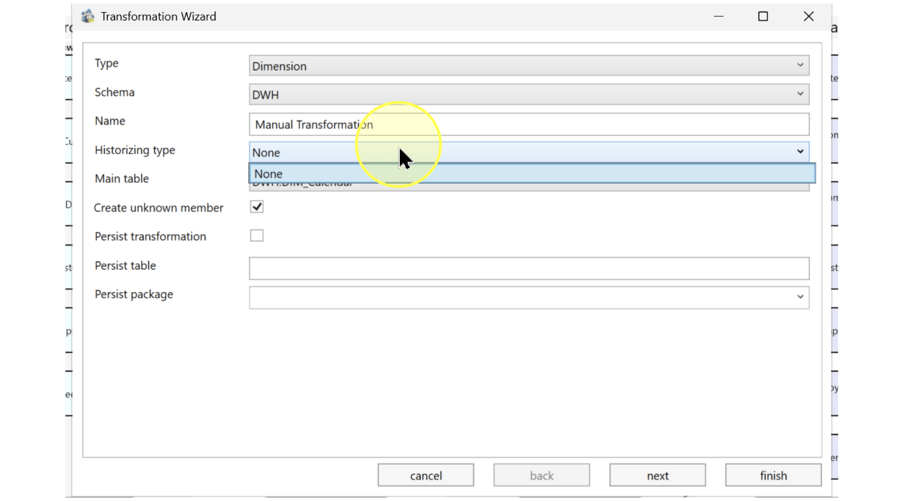
Select the main source table
In Main table, select the existing input needed for the Transformation. Identify it by its actual schema and technical name; DWH.DIM_Calendar is only a screenshot example.
The main table supplies the starting data for this regular-transformation route. Do not leave it empty. Carry the selected input’s verified database identifier, columns, and relevant dependencies into your manually maintained statement in Edit and check the manual view definition.
Expected Results: Main table shows the source you intend to read.
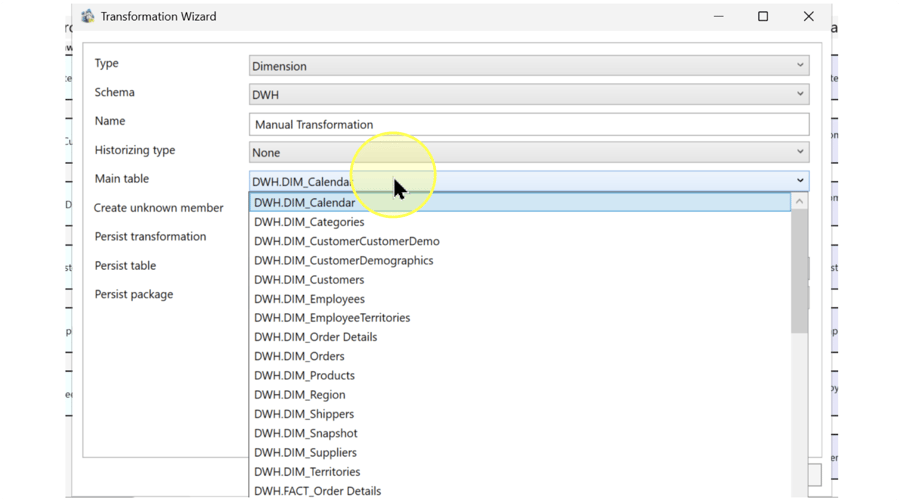
Set unknown-member and persistence choices
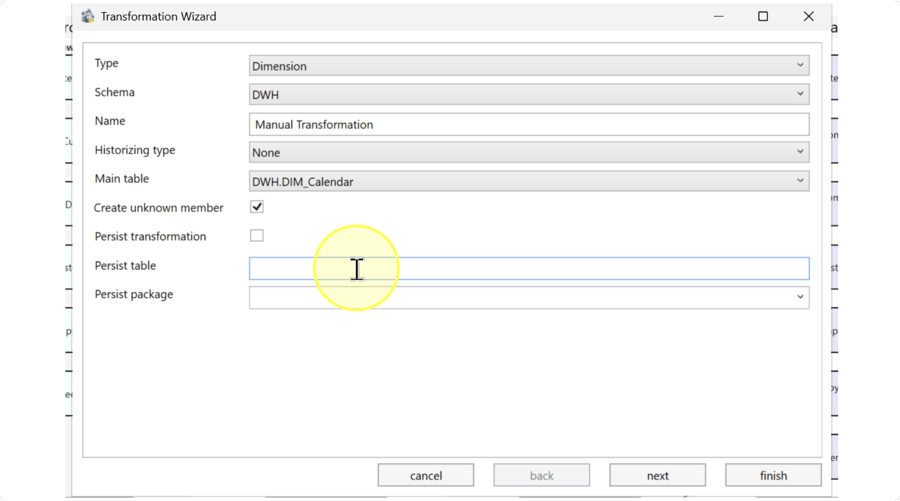
Select Create unknown member if the starting definition needs an unknown-member row; otherwise, clear it. If storage of the result is required, select Persist transformation, enter the intended destination name in Persist table, and select the approved Persist package. If persistence is not required, clear Persist transformation.
- Create unknown member – For a Regular transformation, requests a special row with surrogate key 0 to represent an unknown or unmatched member. A surrogate key is a system-assigned identifier. Select it only when that row is required, then review the actual SQL after switching to Manual.
- Persist transformation – Configures storage of the Transformation’s result in a table. Persistence applies to Regular, Manual, and Union transformations. Select it only with a confirmed destination and execution package; it is separate from saving a definition.
- Persist table – The destination table for a persisted result, not the input table. Enter the approved destination table name when configuring persistence; no table pictured in the capture is required.
- Persist package – The SQL Server Integration Services (SSIS) package responsible for persistence work. Select the approved package when persistence is required; selecting it does not run it.
Screenshot example: Create unknown member is checked in the capture. Use the setting required by your design, not the pictured checkbox state.
Expected Results: the unknown-member choice and persistence configuration match the required starting definition.
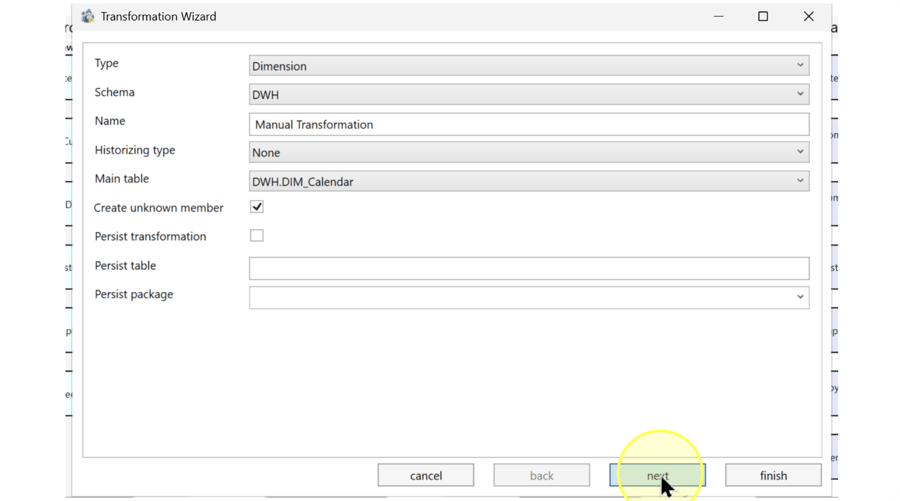
Continue to table and join settings
Click next at the bottom of the wizard.
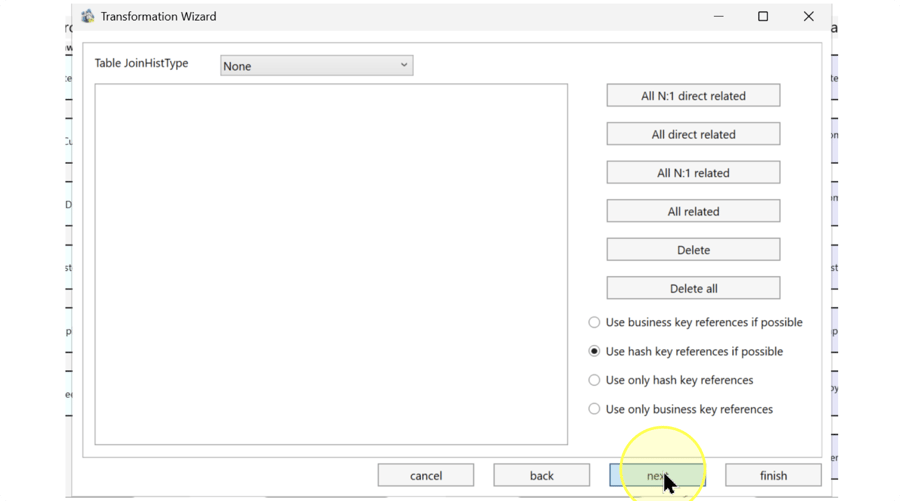
Expected Results: the table-selection page shows Table JoinHistType and related-table controls.
Review related inputs and join settings
On the table-selection page, review Table JoinHistType, the related-table list, and the key-reference choices below the buttons. If your query needs only the main input, leave the related-table list empty; for the non-historized case, select None. If your starting definition needs related inputs, click the applicable relationship button below, inspect every added table, and select the agreed history-join and key-reference settings.
The controls visible in this guide mean:
- Table JoinHistType – The join historization type: how historical versions are handled across joined inputs. None specifies no history-specific join behavior. Choose the setting required by the actual inputs rather than copying the screenshot.
- All N:1 direct related – includes tables directly related to the main table through many-to-one relationships. N:1 means many records on one side can relate to one record on the other; for example, many orders can belong to one customer.
- All direct related – includes directly related tables regardless of relationship cardinality, or how many records relate on each side.
- All N:1 related / All related – also considers indirect relationships: tables reached through other related tables. The N:1 option restricts the relationship type; All related does not.
- Delete / Delete all – removes the selected entry or all entries from this wizard's related-table selection. These are not instructions to delete source database tables.
- Business-key and hash-key reference choices — A business key identifies an entity in business data; a hash key is derived from values using a hash function. Select Use business key references if possible or Use hash key references if possible to express your project's preference. Select Use only hash key references or Use only business key references when the design restricts joins to that key type. Review the resulting references against the actual relationships; the selected hash-key choice in the image is not a recommendation.
Relationship example: All N:1 direct related can include Customers for Orders when that relationship exists, but it includes every qualifying direct relationship—not necessarily Customers alone. Review the full resulting list; these table names are examples, not required inputs.
After reviewing these choices, click next.
Expected Results: the field-settings page opens.
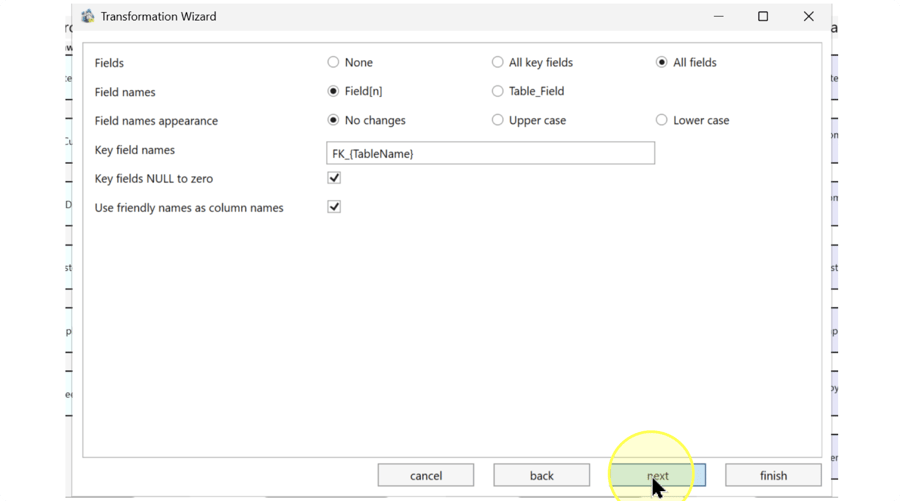
Choose the starting field settings
Choose the required Fields, Field names, and Field names appearance. Review the supported Key field names template, then set Key fields NULL to zero and Use friendly names as column names according to the intended output. None of the pictured values or checkbox states is required solely because it appears in the image.
These choices control the wizard's generated starting definition. Later, inspect and edit the actual manual SQL; do not assume a wizard choice will rewrite SQL that you maintain yourself.
- Fields – None includes no source fields; All key fields includes keys only; All fields includes every field from the selected Transformation tables.
- Field names – Field[n] adds a sequential number when names are duplicated; Table_Field adds the table-name prefix to distinguish duplicated names.
- Field names appearance – No changes preserves casing; Upper case and Lower case change the generated field-name casing.
- Key field names – The key-field naming template. The pictured
FK_{TableName}combines the literal prefixFK_with the placeholder{TableName}. Preserve the placeholder spelling and braces when using this naming pattern, and use the prefix required by your project. - Key fields NULL to zero – converts missing key values, represented by SQL NULL, to 0 in the generated logic. Zero is a replacement value, not proof of a valid matching member.
- Use friendly names as column names – uses a defined readable column name instead of its technical name. Select it when downstream consumers need those friendly names; clear it when they need technical names.
| Setting | Explanation |
|---|---|
| Fields | Example: Select All key fields instead of All fields. Only keys are included in the generated starting definition; descriptive fields are excluded. |
| Field names | Example: Select Table_Field instead of Field[n]. Duplicate names are distinguished using table prefixes instead of numeric suffixes. |
| Field names appearance | Example: Select Upper case instead of No changes. An input name such as CalendarDate becomes CALENDARDATE in the generated field naming. |
| Key fields NULL to zero | Example: Clear the checkbox if the intended logic must preserve missing keys. This setting no longer requests replacement of NULL keys with 0. Inspect other Transformations that may also affect the value. |
| Use friendly names as column names | Example: Clear the checkbox to retain technical names. A technical name such as CustomerCode is used rather than its defined friendly name, for example Customer Code. |
After reviewing the settings, click next.
Expected Results: the Stars and Default transformations page opens.
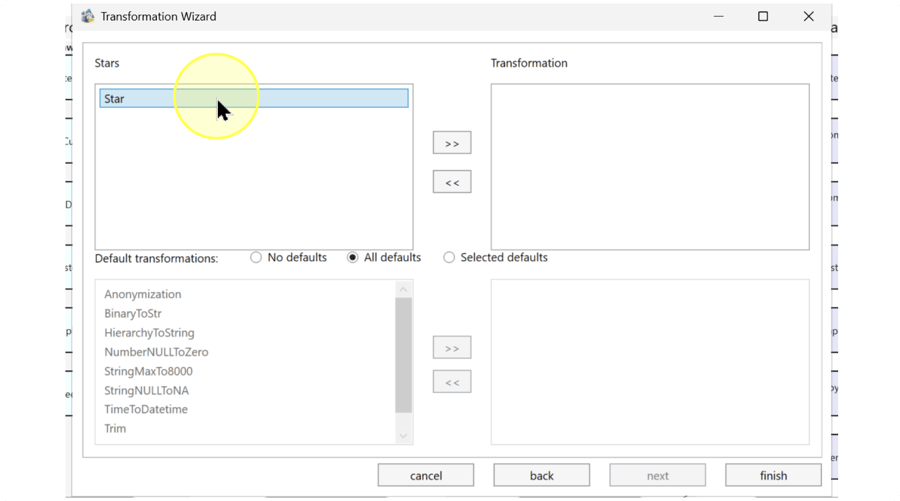
Choose Star assignments and predefined rules
In Stars, select the required entries on the left and click >> to move them to the right-hand Transformation list. Click << to remove unintended selections; leave the selected list empty if no Star assignment is needed. Under Default transformations, choose the required scope. These choices configure the starting definition; review the final manual SQL independently.
- Stars – Identifies the Stars for which the wizard creates Datamart outputs. A Star groups a Fact with related Dimensions. Choose assignments required by your design; the screenshot’s selections or empty list are not prerequisites.
- No defaults – Requests no predefined rules. Choose it when no predefined rule is required for the starting definition.
- All defaults – Applies all configured predefined rules. Choose it only when every configured rule is intended, not because it is selected in the image.
- Selected defaults – uses the selected subset of Predefined transformations from the list.
For Selected defaults, select the required existing rule in the available list, click that area’s >> button, and verify it in the selected list. Rule examples: Trim and StringNULLToNA are pictured rule names. Inspect the saved definitions and matching conditions; do not infer an acronym expansion, replacement value, or behavior from a name.
Expected Results: the selected Stars and predefined-rule scope match the intended starting output.
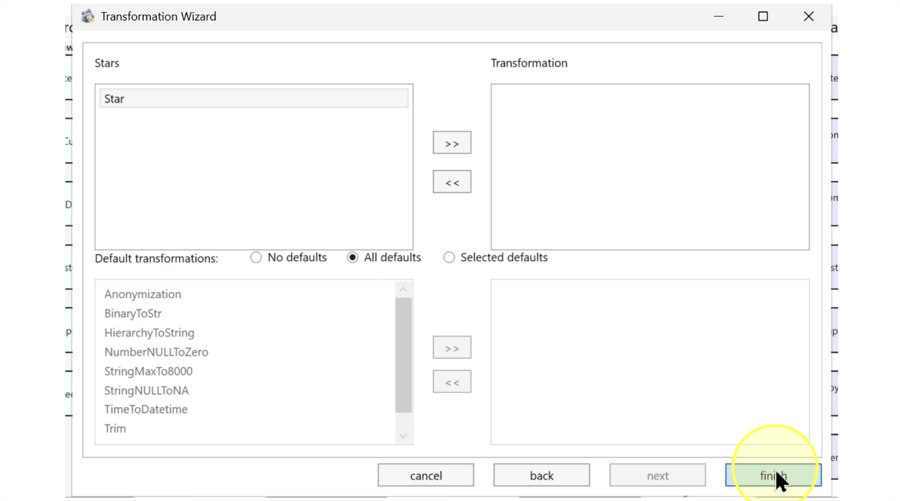
Check the starting definition, then finish the wizard
4.12.1. If any earlier setting needs review, click back to return to that page, then click next to return to the final page.
4.12.2. Confirm the intended regular starting category, schema, unused name, main input, and history strategy.
4.12.3. Confirm unknown-member and persistence settings, related inputs, field settings, Star assignments, and predefined rules against the required starting definition. Confirm that the project's target database and Transformations Createviews setting are still the approved ones before completing the wizard.
Click finish. If validation reports a missing or conflicting value, correct it before continuing.
Expected Results: the Transformation editor opens for the newly created Transformation. You have created its starting definition; the manual SQL has not yet been saved.
Switch the new Transformation to Manual
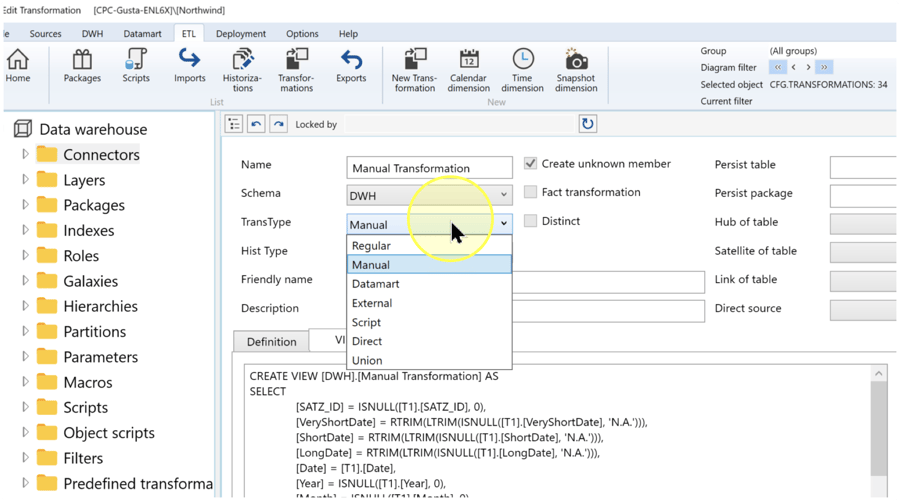
In the editor, confirm the Name and Schema identify the new Transformation—not an existing production object. In the left-hand TransType list, select Manual.
TransType means Transformation type. These are the editor values:
- Regular – a view generated by AnalyticsCreator from maintained Transformation settings.
- Manual – a view whose SQL you maintain yourself. Select this value.
- Datamart – a data mart view generated automatically by AnalyticsCreator.
- External – Transformation work in a manually maintained SSIS package.
- Script – Transformation work expressed as a script.
- Direct – a generated view accessing an external database through a DIRECT Connector.
- Union – a generated UNION view combining inputs.
Check the nearby Hist Type against the intended history strategy. Friendly name is a readable display name, and Description records the purpose. Enter values describing your actual output; Calendar dates and Manual view of calendar dates and years are examples. If you are not adding a display name or purpose note, leave those fields unchanged.
Scope: changing an existing Transformation to Manual changes how its logic is maintained. Use this walkthrough for a new object, not for converting an existing production Transformation. The Hub of table, Satellite of table, Link of table, and Direct source fields visible nearby belong to other configurations and are not used in this example.
Expected Results: TransType shows Manual.
Edit and check the manual view definition
Enter the complete VIEW statement
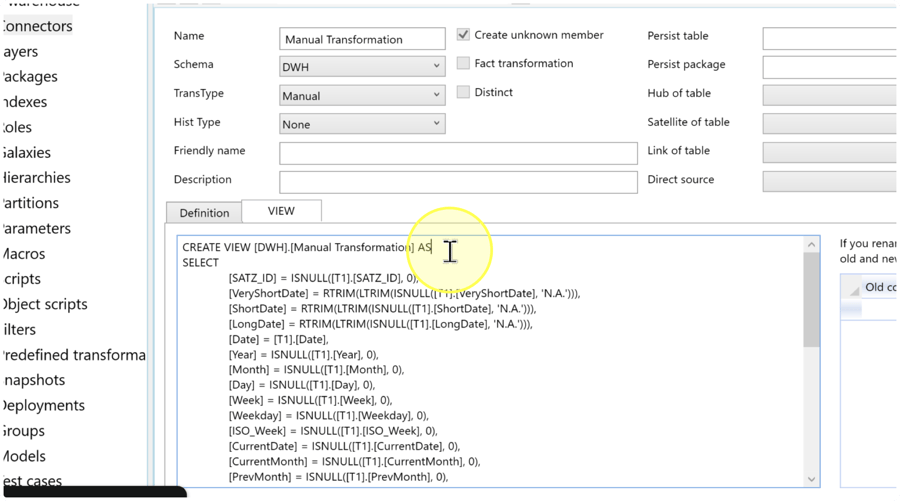
Click the VIEW tab next to Definition. The VIEW tab contains the manual SQL text in the screenshot; do not look for this text on Definition.
Read the generated starting SQL, including its input references, output columns, unknown-member logic, and any predefined rules. Replace or adapt it with the complete, reviewed CREATE VIEW statement needed by your task. Its schema and name must match the new Transformation, and every input and column must exist. Calendar example: the statement below demonstrates the structure only. Use it only if those verified inputs and that output are actually required. It returns the source's Date and Year values under new output names; it does not reproduce the longer pictured query, add an unknown-member row, or apply its NULL-replacement rules.
CREATE VIEW [DWH].[Manual_Calendar] AS SELECT [T1].[Date] AS [CalendarDate], [T1].[Year] AS [CalendarYear] FROM [DWH].[DIM_Calendar] AS [T1];- CREATE VIEW – defines the view's schema, name, and query. Its target name must agree with the Transformation you are editing.
- T1 – a local SQL alias for the source in the FROM clause, not a separate table or product setting.
- AS CalendarDate / AS CalendarYear – assigns explicit output column names to Date and Year.
- FROM – identifies the actual database source. Use its technical schema and name rather than guessing from a friendly label.
Reading the screenshot SQL: ISNULL supplies a replacement for NULL; LTRIM and RTRIM remove leading and trailing spaces. The pictured expression
ISNULL([T1].[Year], 0)replaces a missing year with 0.SATZ_IDis the sample surrogate-key name shown in the query;VeryShortDateis a source-column identifier. These are not controls to change. Confirm the actual source definitions instead of assuming that every project uses these names.Record the output-column renames
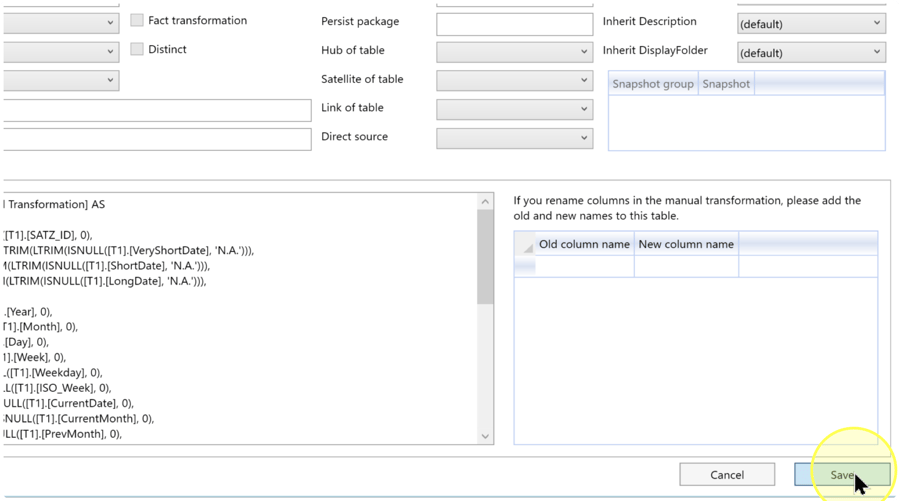
If you changed output column names, enter the actual old and new names in the column-renaming table to the right of the SQL text. Do not enter mappings when no rename is intended. Rename example: the table below records the aliases used by the calendar query above.
Old column name New column name Date CalendarDate Year CalendarYear If your original output names differ because of prior naming choices, use those actual old names. Record only renames you make; do not add these example mappings to an unrelated view.
Check the source references before saving
Dependencies: a dependency is an object referenced by your SQL. Compare all FROM and JOIN inputs with the planned objects. The calendar example uses one input, but your statement may require others. AnalyticsCreator cannot infer every dependency in manually maintained SQL. Confirm the dependency configuration for every referenced table, view, or function before saving when view creation is enabled, and before deployment in all cases. If you add an input that was not part of the starting definition, have its dependency setup reviewed before proceeding. See the Manual transformation.
Keep this as a view query, not a multi-statement batch that loads data or executes unrelated commands. See Microsoft's CREATE VIEW syntax and restrictions.
Expected Results: VIEW contains a complete statement with the intended source and output names; the rename table records your actual changes.
Review and save the manual definition
4.15.1. Confirm that Name and Schema match the SQL header, and TransType is Manual.
4.15.2. Check that the statement is complete: no ellipsis, missing FROM clause, or unresolved placeholders remain. Confirm that the SQL itself implements the intended history, unknown-member, and value-handling behavior.
4.15.3. Check every source and column against its technical database name, and confirm the dependency configuration for the referenced inputs.
4.15.4. If you renamed output columns, check each Old column name and New column name entry against the actual changes. If there are no renames, leave the table empty.
Recheck the target database and the project's Transformations Createviews setting described in Prerequisites. Saving can create a view depending on that setting.
Click Save at the bottom right of the editor, as shown. If an error appears, read it and correct the identified issue; do not treat an attempted save as confirmation.
Expected Results: the editor accepts the save without an error. Complete the read-back checks below to confirm the stored result.
Expected Results
The new Transformation is saved as Manual, with the intended SQL and output column names. To verify the saved definition:
5.1. Click ETL, then Transformations in the List group. Locate the new Transformation by its schema and technical name, then double-click its row to reopen it.
5.2. Confirm that TransType is Manual. Check Name, Schema, and Hist Type against the intended configuration.
5.3. Click VIEW and compare the saved statement with the intended target, inputs, expressions, and output column names. If you renamed columns, verify the new names in the saved SQL; do not use the example mappings as success criteria for an unrelated query.
These checks establish that the definition can be reopened and read back. They do not establish successful package execution, loaded data, or production readiness. View creation on save depends on Transformations Createviews; verify the database result separately in your approved development or deployment workflow.
Decisions and variations
Choose how to start the manual definition
The illustrated route uses Dimension, Fact, or Other to generate a Regular starting definition, then changes TransType to Manual in Switch the new Transformation to Manual. The wizard also offers Manual directly. That is a separate starting route; do not apply the regular-only main-table and field-setting instructions to it.
Keep or change generated logic deliberately
If the starting query already contains the required joins, value handling, or unknown-member logic, retain that SQL while making the intended changes. If you replace it, include every part of the required logic in your manual query. The shorter calendar example in Edit and check the manual view definition intentionally does not reproduce the screenshot's full generated definition.
Configure persistence and renaming only when needed
Select Persist transformation only when the result must be stored in a table, and supply the destination and package in Set unknown-member and persistence choices. Package execution remains separate. Enter old/new name mappings only for output columns that you actually rename, as explained in Edit and check the manual view definition.
Troubleshooting
- Expected object or control is missing — Check the current project and the object's technical schema and name. If regular-transformation pages are missing, check whether you selected Manual directly in the wizard instead of the starting category in Select the starting Transformation type. Compare the interface with your installed version before continuing.
- Result differs from the design — Reopen the intended Transformation and compare the saved VIEW text with the design. Check input identifiers, joins, output aliases, and any logic removed when replacing the generated SQL. Review renames against Edit and check the manual view definition, then test representative inputs through the approved development workflow.
Save reports an error: use the message to identify the failing statement or object. Recheck the target schema and name, referenced inputs and columns, complete SQL syntax, and Transformations Createviews setting. Correct the identified issue before saving again; an attempted save is not confirmation of success.
