
Create and manage object groups
Introduction
Create or update an object group to organize related Sources, tables, and Transformations in your Data Warehouse (DWH) project. Object groups let you focus the dataflow diagram on a named set of objects and their related flow context.
Use this how-to to name and describe the group, configure workflow filenames when needed for deployment, and change its lock when required. The result is a saved group definition that you can reopen and check.
Applicability
Use these steps in AnalyticsCreator desktop to create and maintain object-group definitions in the Groups dialog. To assign objects to a saved group, follow Add objects to an object group. User groups organize shared access and are a separate feature.
Prerequisites
3.1. An open Data Warehouse (DWH) project that you can edit.
3.2. A name and purpose for a new group, or the identity of the existing group you need to update.
3.3. If deployment must produce configuration scripts for this group, the intended workflow scope and SQL configuration filenames.
3.4. If you need to release an existing group lock, you must hold that lock or be the repository owner. The repository owner can release another user's group lock.
Steps
Open the Groups context menu
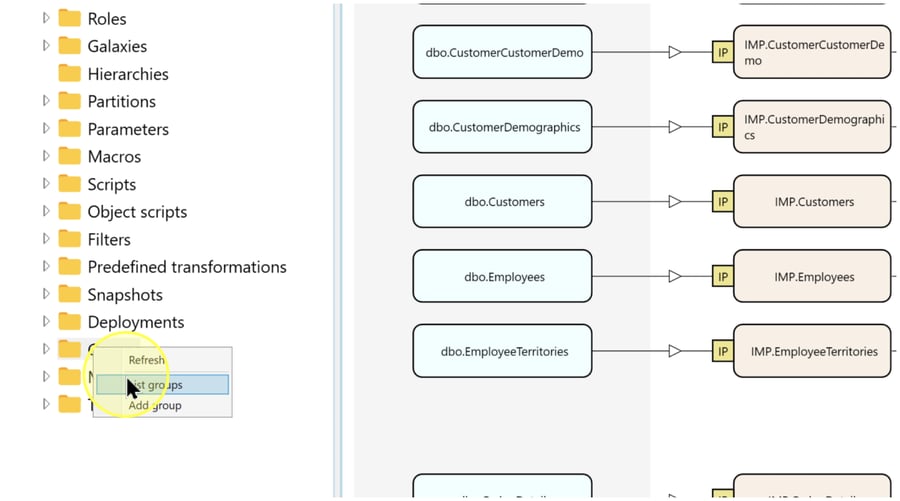
Confirm that the intended Data Warehouse (DWH) project is open. In the left navigation tree, right-click Groups, the entry for object groups.

Open the group definitions
To update an existing group, select List groups from the context menu. To create a group, select Add group. Both choices open the Groups dialog.
Enter or update the group settings
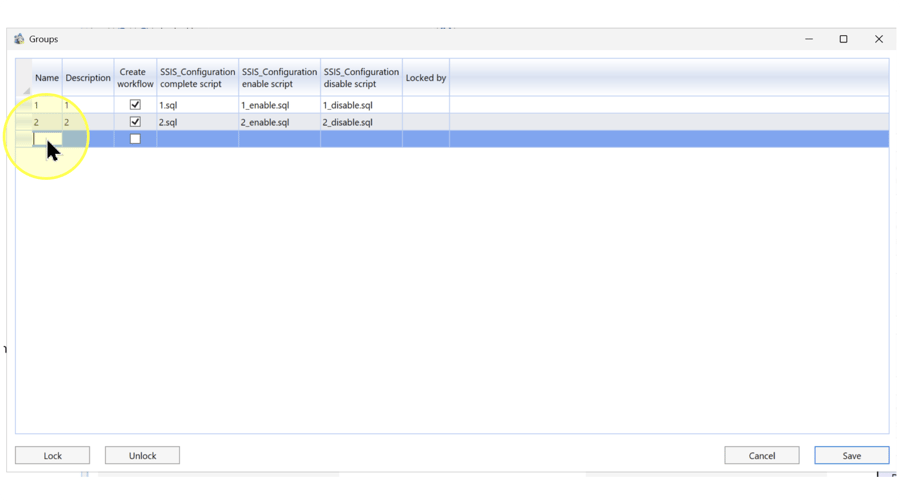
In the Groups dialog, each populated row represents a group. To create one, enter its name in the Name cell of the blank row beneath the existing groups. To update one, identify its row by Name and Description.
Before editing an existing group, inspect Locked by, the column identifying the user who holds its lock. Only the lock owner can edit a locked group. If another user holds the lock, arrange for that user or the repository owner to release it using Change the group lock when required before continuing.
Enter a meaningful Name and a Description of the group's intended object scope. If deployment must generate processing configuration for this group, select Create workflow and enter or review all three script filenames below. If the group is used only to focus the diagram and needs no workflow output, leave Create workflow clear, or clear it when removing that requirement from an existing group.
- Name / Description — The group identifier and a description of the objects it is intended to organize. Enter values that let you distinguish it from other groups.
- Create workflow — When selected, deployment creates SQL configuration scripts for processing objects related to this group. These settings support SQL Server Integration Services (SSIS) processing. Selecting the checkbox and saving the group records the configuration; script generation occurs during deployment.
- SSIS_Configuration complete script — The name of the SQL file containing the processing configuration for objects related to this group. Set this filename when Create workflow is selected.
- SSIS_Configuration enable script — The name of the SQL configuration file used to enable processing of objects related to this group. Set this filename when Create workflow is selected.
- SSIS_Configuration disable script — The name of the SQL configuration file used to disable processing of objects related to this group. Set this filename when Create workflow is selected.
Filename examples: 1.sql, 1_enable.sql, and 1_disable.sql illustrate the complete, enable, and disable filenames for the pictured group. Use the filenames required by your deployment plan. The group names 1 and 2, descriptions, and selected checkboxes are examples.
Change the group lock when required
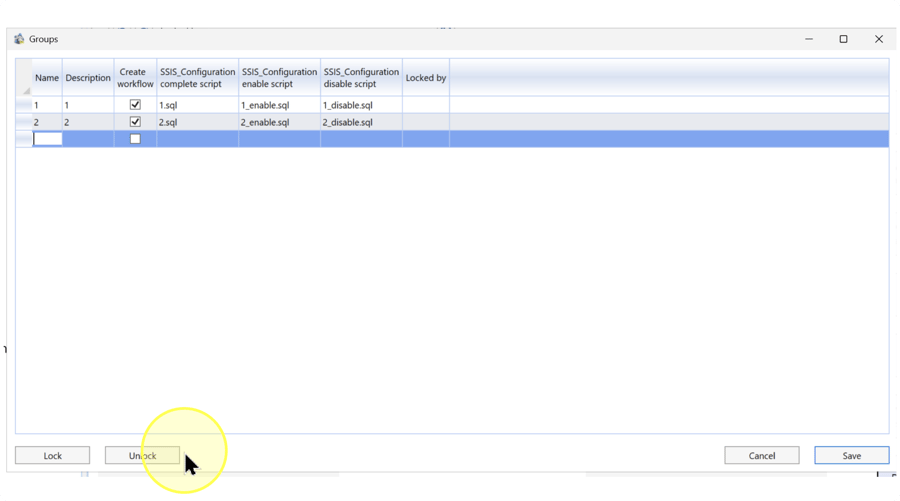
If the lock must change, select the intended group row and check Locked by. A group lock reserves the group and its related objects for editing by the lock owner.
4.4.1. To reserve an unlocked group for your editing work, click Lock. Check that Locked by identifies you as the lock owner.
4.4.2. To release a group lock that you hold, click Unlock. The repository owner can also release another user's group lock. Check that Locked by no longer shows an owner after the release.
If no lock change is needed, leave the lock state unchanged. If you came here to release a lock before editing, return to Enter or update the group settings to finish the group settings.
Save and reopen the group definitions
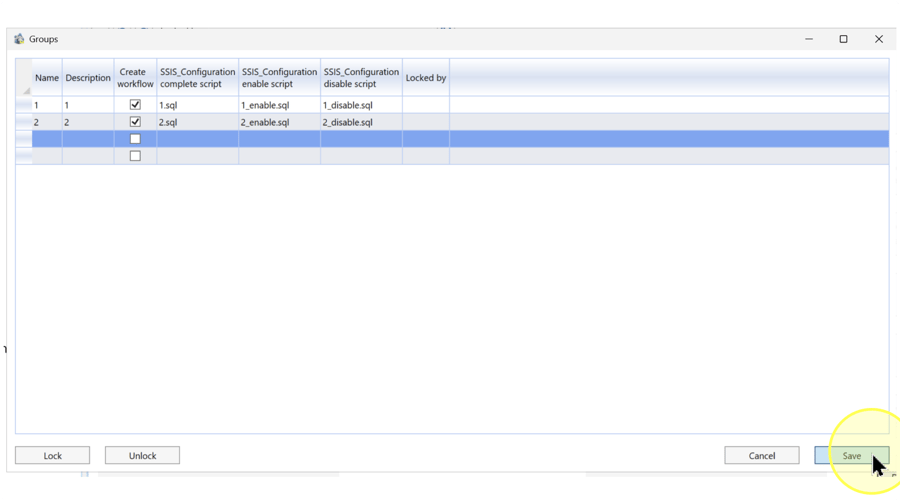
Review each group row you changed: check Name, Description, Create workflow, the script filenames when workflow output is required, and Locked by. Click Save.
Right-click Groups in the navigation tree and select List groups again. Locate the saved group by name and complete the checks in Expected Results.
For a new group that needs members, continue with Add objects to an object group. Saving its name and settings does not assign objects to it or run processing.
Expected Results
The group definition is saved with the settings you intended. Verify the result in the reopened Groups dialog and the navigation tree:
5.1. Locate each created or updated group by Name and confirm its Description.
5.2. Confirm that Create workflow matches the group's purpose. When selected, compare all three script filenames with the intended deployment configuration.
5.3. If you changed the lock, inspect Locked by. A locked group should identify the intended owner; an unlocked group should show no lock owner.
5.4. Expand Groups in the navigation tree and find the intended group.
These checks verify the saved definition and lock state. Workflow files are generated during deployment; saving their filenames does not generate or execute them.
Decisions and variations
6.1. Create or update a group. Select Add group for a new definition or List groups to review an existing definition, as described in Open the group definitions.
6.2. Diagram organization or workflow output. A group used only to focus the diagram does not require Create workflow. Select it when deployment must generate the group's processing configuration, and review the three filenames in Enter or update the group settings.
6.3. Lock, unlock, or retain the current state. Follow Change the group lock when required when reserving the group for editing or releasing a lock. Leave the current state unchanged when no lock change is required.
Troubleshooting
- Expected item is missing — Confirm that the intended Data Warehouse (DWH) project is open. Right-click Groups and select List groups, then check for the saved name. If the group appears in the list but not in the navigation tree, right-click Groups, select Refresh, and check the expanded branch again.
- A change is not retained — Reopen List groups and compare the same row's settings with your intended changes. Check that you clicked Save. If another user appears in Locked by, arrange for the lock owner or repository owner to release the lock before editing again. Review any message shown when saving before retrying.
