
Configure an OLEDB Connector
Introduction
A Connector stores the settings used to connect to a source system. The OLEDB Connector connects through an OLE DB provider, the software component that provides access to that source. Use this how-to to name, configure, test, and save a new Connector in your Data Warehouse (DWH) project.
The intended outcome is a saved Connector with the correct source connection settings and a successful connection test. Reading source metadata and loading data are separate tasks.
Applicability
Use these steps when your source is accessible through an installed OLE DB provider and you need a new OLEDB Connector. The SQL Server connection string shown below is an example; other providers require their own connection-string syntax and authentication settings.
The steps use the AnalyticsCreator desktop interface shown in the screenshots. No specific product version is identified. Provider installation, source-account setup, and Azure-specific configuration are outside this workflow.
Prerequisites
3.1. An open Data Warehouse (DWH) project that you can edit, and a Connector name that identifies the intended source.
3.2. An OLE DB provider installed in the environment used to connect, with a connection configuration for your source: provider identifier, endpoint, database or other source location, authentication method, and any additional settings required by that provider.
3.3. Access to the intended source using the account required by that authentication method. If the connection uses a password, have the required credentials available. If it uses an encrypted-string alias, have the corresponding entry already configured in Encrypted strings.
3.4. Your project's requirement for storing the connection string in CFG.SSIS_Configurations. This determines the checkbox selection in Review connection-string storage and source classification.
Steps
Open the Connector editor
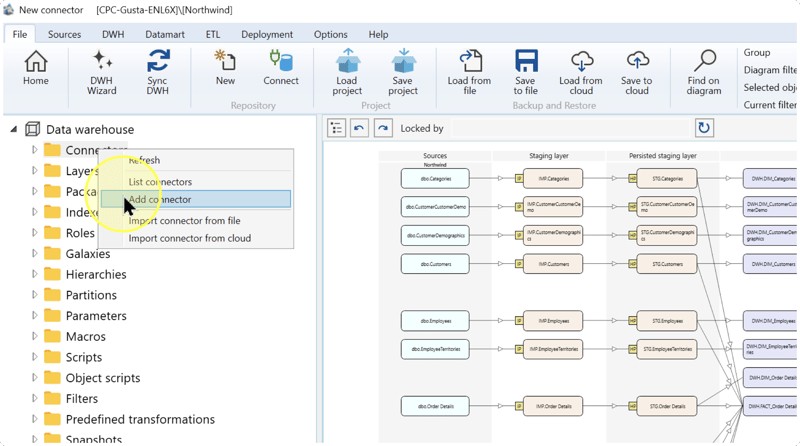
In the left navigation tree, right-click Connectors and select Add connector. The new Connector editor opens.
Name the Connector and select OLEDB
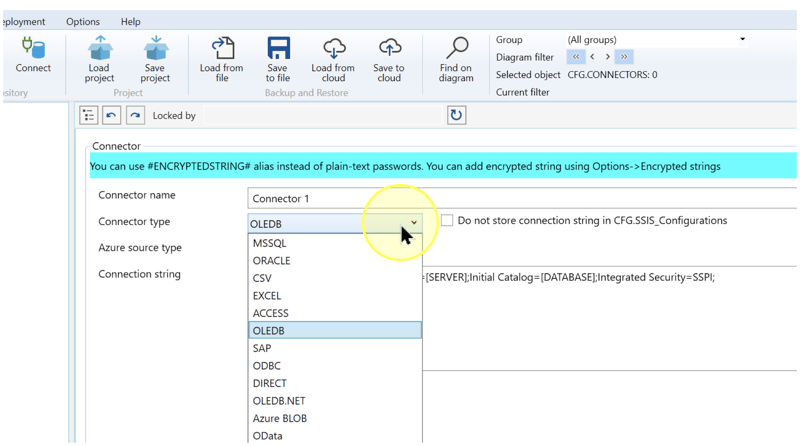
In the editor, enter a name that identifies your source in Connector name. In Connector type, select OLEDB. Confirm this selection before entering the connection string, because the connection settings and template depend on the Connector type.
Connector name identifies the saved connection in your Data Warehouse (DWH) project. Connector type selects the connection technology. OLEDB.NET is a separate choice; this workflow uses OLEDB.
Enter the source connection string
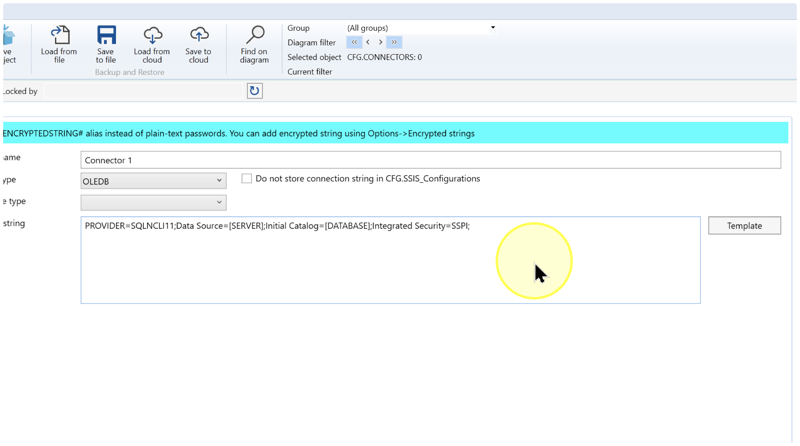
Enter your provider's connection configuration in Connection string. A connection string is text containing the provider, source location, authentication, and other settings needed to connect. If you need a starting string, click Template, then replace its placeholders with your source values. If you already have a complete connection string for your source and provider, enter it directly.
The editor provides one Connection string box for these settings. Work through the following explanations before testing:
- PROVIDER — Enter the identifier of the installed OLE DB provider required by your source configuration.
SQLNCLI11is the SQL Server provider in the screenshot. It is an illustrative value, not a provider requirement for every OLEDB Connector. - Endpoint and database — In the illustrated SQL Server string,
Data Sourceidentifies the server andInitial Catalogidentifies the database. Replace[SERVER]and[DATABASE]with your actual values, including the instance name when your connection configuration specifies one. Other providers can use different keys. - Authentication and provider properties — Enter the authentication and additional connection settings required by your provider. In the SQL Server example,
Integrated Security=SSPIselects Windows authentication. Retain it only when your source uses that authentication method. For another method, use the corresponding provider-specific connection string, including credentials when required.
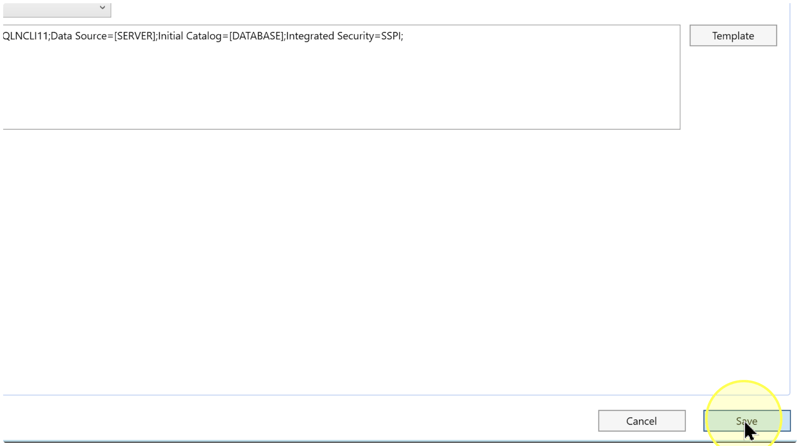
Template example: the capture shows the following SQL Server string. Replace the bracketed placeholders before testing; retain key names and separators required by your provider.
PROVIDER=SQLNCLI11;
For example, replacing [SERVER] with your SQL Server endpoint and [DATABASE] with your database name directs this string to that database using Windows authentication. This example applies only when that provider and authentication method match your configuration. See Connector for the template keys and the provider documentation.
Encrypted password values: if your connection requires a password and your project uses an encrypted-string alias, enter the configured alias in place of the password value. The editor banner shows the alias form #ENCRYPTEDSTRING#. Encrypted strings, available through Options → Encrypted strings, maintains the protected values. Use the alias for an existing entry; the banner text is not a password to copy. A connection that uses Windows authentication does not require adding a password to this example.
Review connection-string storage and source classification
Before testing, review the settings beside and below Connector type, visible in the preceding screenshots:
- Do not store connection string in CFG.SSIS_Configurations — Select this checkbox when your project requires excluding the connection string from the named configuration table. Clear it when your project requires storing the connection string there. This setting concerns that table; it does not replace saving the Connector definition in Save the tested Connector.
- Azure source type — This is a separate source-classification setting. If your source configuration specifies an Azure source type, use that prescribed value. Otherwise, leave it unchanged. Selecting OLEDB does not mean you should copy a value from another Azure configuration.
The blank Azure source type and cleared storage checkbox in the screenshots illustrate that configuration; they do not establish defaults for your project.
Test the connection
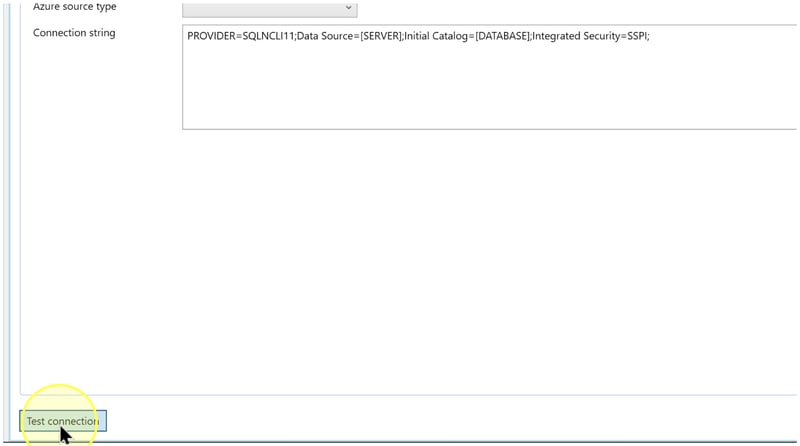
Click Test connection at the bottom left of the Connector editor and read the reported result.
If the test fails, use the reported error to identify the provider, source location, or authentication setting to correct. Review Troubleshooting, correct the connection string, and click Test connection again. Continue to saving after the test reports success for the intended source.
Expected Results: the connection test reports success using the entered settings. Clicking the button alone does not establish success.
Save the tested Connector
Review Connector name, Connector type, Connection string, and the selections from Review connection-string storage and source classification. If you change connection settings after a successful test, repeat Test the connection. Click Save at the bottom right of the Connector editor to save the definition.
Expected Results: the saved Connector appears under Connectors in the navigation tree.
Reopen and verify the saved Connector
4.7.1. Expand Connectors in the navigation tree and locate the name you saved. If you need a list of entries, right-click Connectors and select List connectors.
4.7.2. In the navigation tree, right-click the saved Connector and select Edit connector. Check Connector name, Connector type, Connection string, and the selections from Review connection-string storage and source classification against your intended configuration.
4.7.3. Click Test connection and verify that the saved settings produce a successful result. If corrections are needed, repeat Enter the source connection string, then reopen and check the saved definition again.
Expected Results
5.1. The Connector is present under Connectors in the intended Data Warehouse (DWH) project with the name you entered.
5.2. The saved definition has Connector type set to OLEDB, the intended provider and source connection settings, and the storage and source-classification selections you reviewed.
5.3. Test connection reports success when you reopen the saved Connector and test its settings.
A successful test verifies connectivity for that test. Saving the definition does not read Source metadata, run a package, deploy the project, or load data. A Source is an input object supplied by a Connector; selecting and importing its metadata is a subsequent task.
Decisions and variations
- Template or prepared connection string — Use Template when you need a starting string; enter a prepared string directly when you already have the configuration for your source. In both cases, check the provider, source location, and authentication in Enter the source connection string.
- Provider and authentication — Use the syntax for your installed provider and intended authentication method. The SQLNCLI11 example uses Windows authentication; a different provider or authentication method can require different keys and values.
- Project-specific settings — Apply the connection-string storage requirement and any prescribed Azure source classification at Review connection-string storage and source classification. Encrypted-password handling belongs with the connection string in Enter the source connection string.
- Metadata design without a live connection — A Connector can be used with metadata already stored in the project without a live connection. That path does not meet this how-to's successful-test outcome. Use Use existing Source metadata with DWH Wizard when reusing existing definitions.
Troubleshooting
- Provider or driver error — Compare the
PROVIDERvalue with the installed provider required by your source configuration. Check that this provider is available in the connecting environment. If it is missing or the identifier differs, resolve that mismatch with the source administrator, then repeat Test connection. - Connection or authentication failure — Read the reported error and check the endpoint, database, and authentication settings. Replace any remaining template placeholders. For Windows authentication, confirm access for the connecting Windows account; for password-based authentication, check the required credentials or configured encrypted-string alias. If your provider uses a file path, check that the connecting account can access it. Correct the reported issue and test again before saving.
- Saved item not found — Confirm that you clicked Save and that you are checking the intended Data Warehouse (DWH) project. Right-click Connectors and select List connectors to look for the actual name you entered. If the definition was not saved, return to the Connector editor, resolve any reported save error, and save the tested definition.
