
Read metadata from a Connector with DWH Wizard
Introduction
The Data Warehouse (DWH) setup flow is named DWH Wizard. It guides you through turning source metadata into draft objects in an AnalyticsCreator Data Warehouse (DWH) project. Metadata describes structure, such as tables, views, columns, and data types; it is not the rows of business data. A Connector defines the connection to a source system. A Source is an input object supplied by a Connector and represented in the dataflow diagram.
Use this page to read metadata from a configured Connector, select the required Sources, decide which objects to generate, and review naming and generation settings before finishing. Choose the Sources, classifications, and settings required by your own project; the screenshots illustrate the interface, not a required dataset.
Expected Results: the intended source metadata and the draft definitions requested by your classifications can be found and checked in the project. Finishing this wizard is not a demonstration of package execution, loaded data, or production readiness.
Screenshot examples: object names, selected rows, schema names, dates, and other values shown in the images are visual examples, not prerequisites or required choices. Use your own project’s objects and settings. Exact control names and task requirements—such as selecting Read metadata from connector for an external read—still apply. The examples below show how to configure the settings; you do not need to reproduce them.
Applicability
The main steps cover reading external metadata from a configured Connector, selecting one or more Sources, and reviewing the definitions to generate. Architecture, classifications, and generation settings depend on your Data Warehouse (DWH) project. Conditional guidance for Data Vault and SAP is included where relevant; it does not establish every supported configuration or replace a Connector-specific setup guide.
Some images show existing-metadata mode, previously imported Sources, or different option selections. Each relevant step identifies the difference. Follow the task instructions and your project requirements rather than copying screenshot values.
Prerequisites
3.1. An open development Data Warehouse (DWH) project that you can edit. Confirm the project and target environment before creating or refreshing definitions.
3.2. A configured Connector with a non-empty, valid connection string and credentials allowed to read metadata. Microsoft SQL Server is the illustrated source system. The CSV Connector type connects to delimited text files; other Connector types can expose different metadata and settings.
3.3. The source schemas and objects whose metadata you intend to read, verified as available through the configured Connector. No particular object shown in a screenshot is required.
3.4. A decision whether each intended Source is new to the project or may be refreshed. Existing-source refreshes must be deliberate.
3.5. An approved architecture, the definitions required for each Source, target schemas, and a naming convention. Identify any required relationships, date dimensions, predefined rules, and Star assignments before finishing; none is required solely because it appears in an image.
3.6. Permission and a recovery plan appropriate to changes in the project. This wizard creates or refreshes definitions; it is not only a read-only preview.
Empty connection string: use only Use metadata of existing sources in that case. That mode reuses definitions already stored for the Connector. It is a different task; fix the Connector setup before following the external-read path here.
Steps
Select the Connector
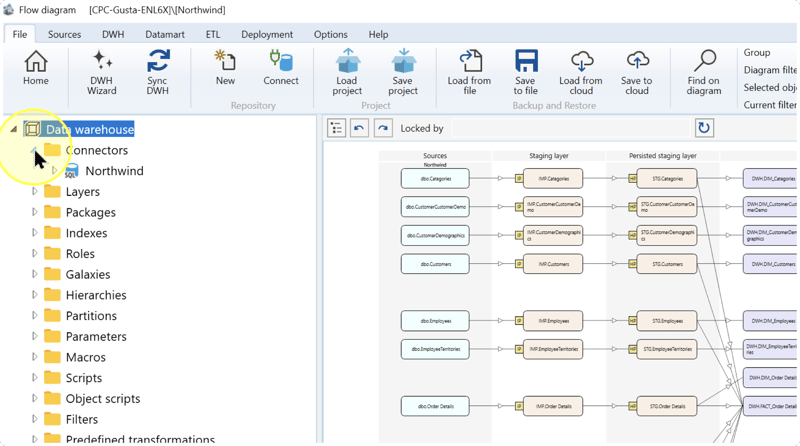
In the left navigation tree, expand Connectors and select the configured Connector whose metadata you need. Check that you are in the intended development Data Warehouse (DWH) project. Screenshot example: Northwind is the Connector pictured here; select the Connector configured for your source system.
Reading the diagram: the background shows existing objects, not the result of this run. Use the following explanations to distinguish layers, flow markers, and example names:
- Staging Layer (IMP) – The layer used for imported source data. IMP identifies this layer; it does not require a particular schema name.
- Persisted Staging Layer (STG) – The layer used for persisted staging data. STG identifies this layer. The separate schema type Persisted staging provides a durable staging area retained beyond a transient import step.
- Import — IP marker – The flow from an external Source object into an IMP object in the Staging Layer (IMP). IP is the documented diagram marker for Import; it is not the name of a Source you must select.
- Historization — HP marker – The flow from an IMP object in the Staging Layer (IMP) to an STG object in the Persisted Staging Layer (STG). HP is the documented diagram marker for Historization.
- Dimension — pictured DIM prefix – A Dimension represents descriptive business data prepared for analytical use. DIM appears in the illustrated Dimension naming; the pictured object names are examples, not required identifiers.
- ETL – The toolbar tab that opens package, script, Import, Historization, Transformation, and new-dimension workflows. Use this tab to open these processing workflows.
These layer terms and markers explain the diagram. They do not require you to reproduce the pictured Source names, object names, or schema assignments.
Open DWH Wizard
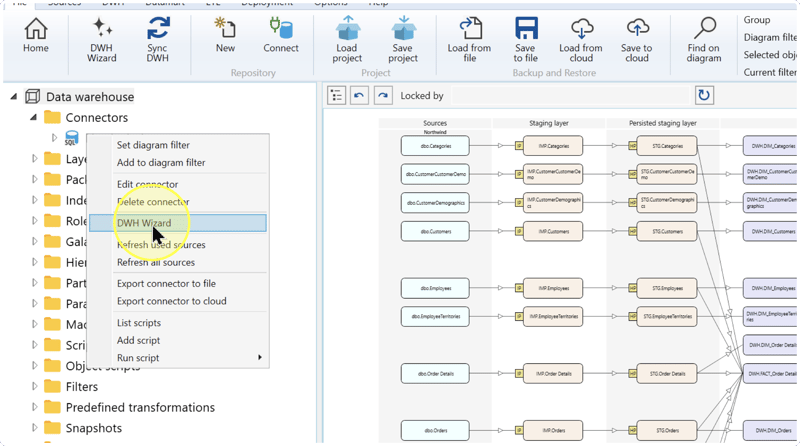
Right-click the Connector and choose DWH Wizard from its context menu.
Expected Results: the wizard opens.
Confirm the Connector and select the external-read mode
The first wizard screen has three working areas:
- Read – Select the Connector, metadata mode, and filters.
- Select – Choose rows from the list of Source objects.
- Classify – Choose which definitions to generate for the selected Sources.
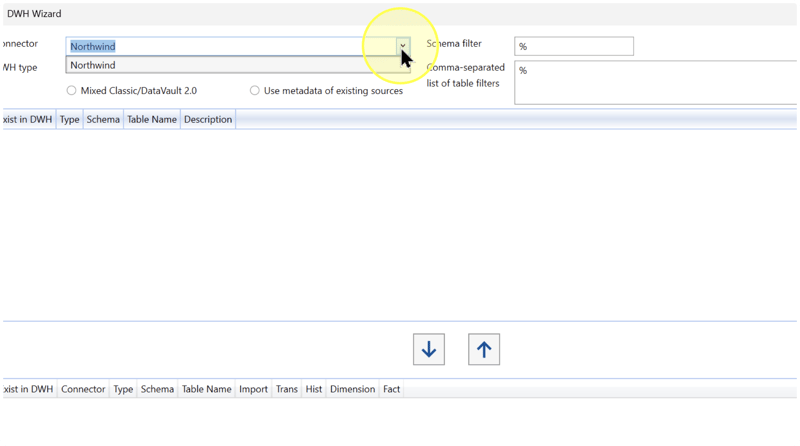
In Connector, confirm the intended entry. Select Read metadata from connector. Do not select the existing-metadata option for this external-read task.
- Connector – The configured connection to the source system. Select the intended Connector, not just another entry with accessible metadata.
- Read metadata from connector – Reads source metadata from the external system. Select this for the task in this guide.
- Use metadata of existing sources – Uses Source definitions already stored for the Connector. This is the only supported option when the Connector connection string is empty. It does not perform a new external metadata read.
Check before continuing: the Connector must have a valid connection string and permission to read the source metadata. If only Use metadata of existing sources is available, resolve the Connector setup first; it is not an equivalent external-read mode.
SAP-specific settings: SAP is a source-system Connector type. If you use an SAP Connector, review the following source settings against your extraction requirements. They do not apply to non-SAP Connectors.
- Tables – SAP-only source-list option: shows SAP tables.
- DeltaQ – SAP-only source-list option for SAP Delta Queue Sources. It is not the same as selecting ordinary tables.
- ODP – SAP-only source-list option for Operational Data Provisioning (ODP). The wizard displays this choice as ODP.
Set filters to narrow the metadata read
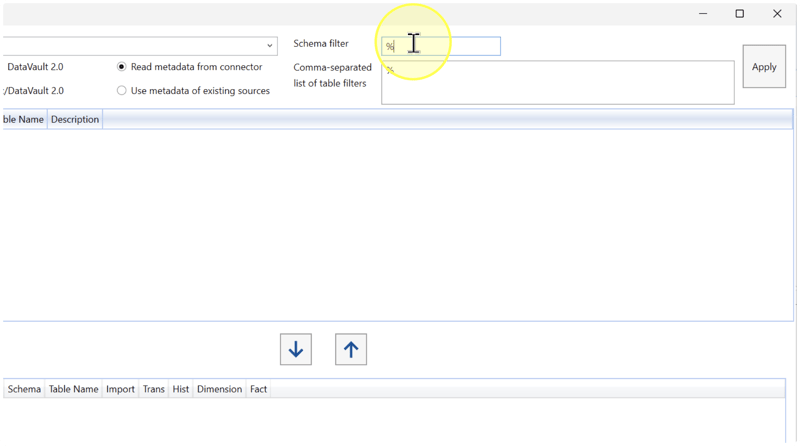
To narrow the metadata read, enter the intended source schema or a matching pattern in Schema filter. In Comma-separated list of table filters, enter the Source object names or patterns you need, separated by commas. Use names verified in your source system. If you need an unrestricted list, leave the filters blank and review the returned objects before selecting them.
- Schema filter – Limits objects by their source schema. The documented patterns include dbo, prod%, and %umanres%. A schema is the namespace grouping Source objects.
- Comma-separated list of table filters – Limits Source object names using names or patterns separated by commas. Documented examples include %MyTable%, BKPF,BSEG,KNA1,LFA1, and TBL1%,TBL2%,TBL3%. These are illustrative names, not objects required in your source system.
Filter examples: the following names and patterns demonstrate the fields. They are not values you must enter; substitute your actual Source names and selection requirements.
| Example | What to enter | What to check |
|---|---|---|
| Read one known table | Schema filter: dbo; table filters: Categories. | Requests the Categories object in the source schema dbo. |
| Read two known tables | Schema filter: dbo; table filters: Categories,Products. | Requests those two objects, if present and visible to the Connector. |
| Match a naming pattern | Use a documented pattern such as prod% for schemas or TBL1% for table names. | The examples use % as a wildcard. Review the returned list before selecting anything. |
| Read without restricting the list | Leave the filters blank. | Can return many objects; large source systems can take longer. A broad read does not mean every returned row should be classified. |
The SAP names BKPF, BSEG, KNA1, and LFA1 are sample technical table names. They are not settings or required objects for this task.
Expected Results: the filter fields contain the values required for your metadata read, or are blank for an unrestricted list. Click Apply in Read and inspect the Source list to retrieve the matching objects.
Read and inspect the Source list
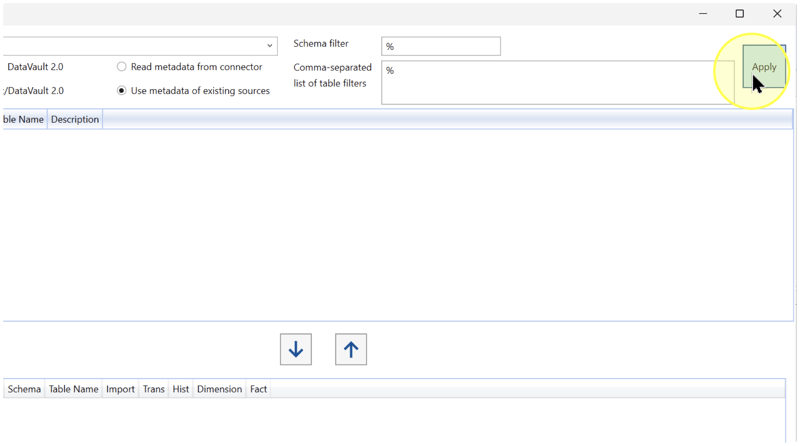
Immediately before clicking Apply, confirm that Read metadata from connector is selected and that your filter values are correct. Then click Apply.
Expected Results: the upper list shows the matching objects exposed by the Connector. Check each intended object’s Type, Schema, and Table Name against your source system and filters; no particular pictured row is required. Apply reads the list; it is not the final generation or data-loading step.
Screenshot difference: this Apply capture has Use metadata of existing sources selected. Do not copy that selection: this page requires Read metadata from connector.
Select the required Source rows and check refresh status
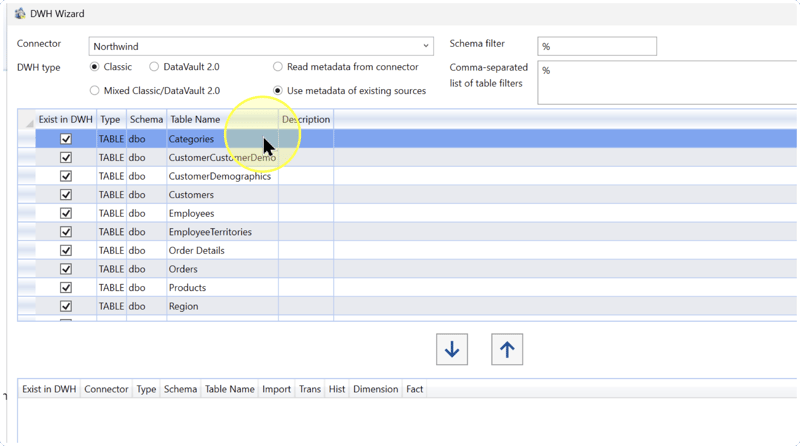
Select the row for the Source object whose metadata you want to use. Identify it by its Connector, Type, Schema, and Table Name, rather than its position in the screenshot. To select several required rows, hold Ctrl while clicking individual rows, or use Shift to select a range. Inspect every selected row before moving it.
- Exist in DWH – Read-only status showing that the Source is already imported. Such a Source will be refreshed. This is not the checkbox used to select a row, and it is not proof that data is loaded.
- Connector – The Source's Connector name. Check it when several Connectors are involved.
- Type – The Source object type displayed in the list, such as TABLE, VIEW, DELTAQ, or ODP. TABLE identifies a source table; VIEW identifies a database view exposed by a Connector. Keep the displayed type label when identifying a row.
- Schema – The source schema, such as dbo in the capture. It is separate from the target schemas configured later.
- Table Name – The Source object's name. Check that it identifies the object you intend to use. Categories is an illustrative name in the capture, not a required Source.
Refresh warning: the capture shows checked Exist in DWH statuses. Those rows already exist in the project and will be refreshed. Proceed with an existing row only when that refresh is intended and approved. If the task is to add a new Source, confirm that it is not already imported; if it is to refresh a Source, confirm the intended refresh scope.
Move the selected rows into the classification area
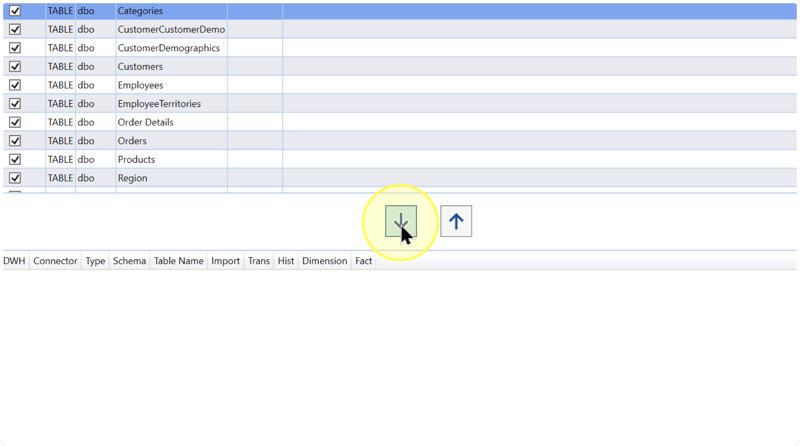
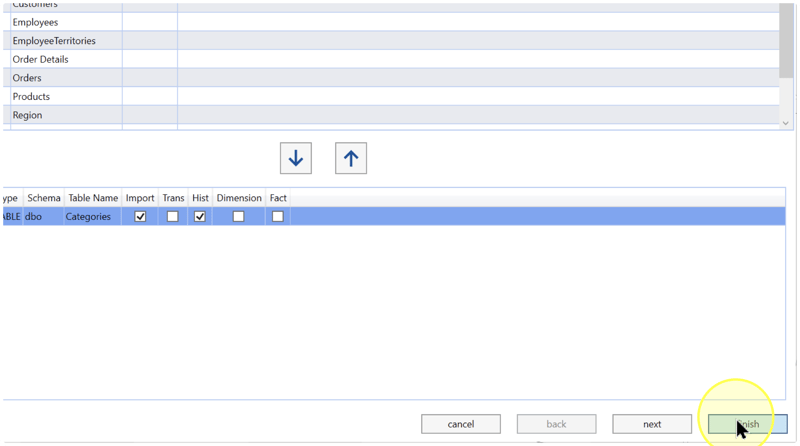
Click the down-arrow button (↓) between the upper Source list and the lower classification list. This is the button shown in the current capture.
Expected Results: the intended rows appear in the lower list with their Connector, Type, Schema, and Table Name. Compare those values with the Source objects you selected. Confirm that every required row is present and that no unintended rows were transferred.
Choose the Data Warehouse (DWH) architecture
On the same first wizard screen, set DWH type to the approved architecture for your Data Warehouse (DWH) project. Review the choices below before classifying the Sources. Do not change an existing project’s architecture just to match a screenshot; if the intended architecture is unknown, confirm it before continuing.
- Classic – The Kimball-style target architecture. Select it when that is the approved architecture. It is the documented default, not a reason to change an existing project's design.
- DataVault 2.0 – The Data Vault target architecture. It exposes additional Auto, Hub/Sat, and Link classification choices. A hub represents a business entity's key, a satellite holds descriptive/history information, and a link represents a relationship; choose the required structures from an approved design.
- Mixed Classic/DataVault 2.0 – A mixed approach: Kimball structures with hash keys instead of business keys. A business key identifies an entity in source business data; a hash key is derived from values by a hash function. This is a distinct architecture choice; use it only when it matches the approved design.
Expected Results: the classification columns match the selected architecture. Do not configure the rows first and then change the architecture without reviewing those choices again.
Classify each selected Source
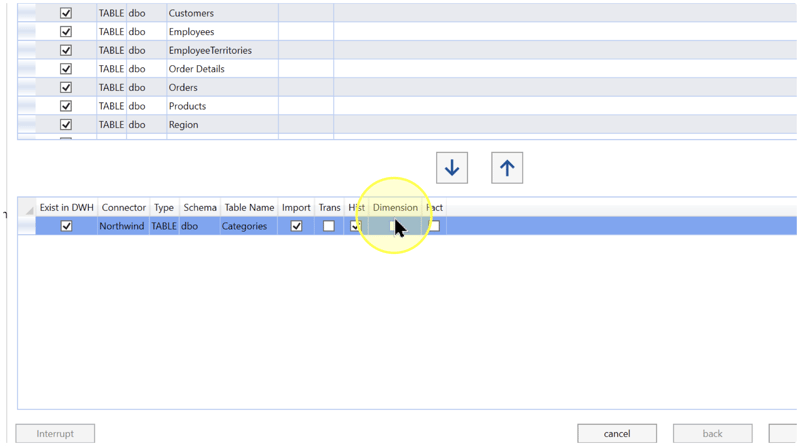
For each row in the lower classification list, select the classification settings that correspond to the definitions required for that Source. Use the explanations below to distinguish the outputs. Review the complete combination for each row; neither the pictured Source name nor its checked boxes determine what your project needs.
- Import – Configures the Import flow from an external Source object into an IMP object in the Staging Layer (IMP). Selecting it requests the definition of that flow; it does not itself run a data load.
- Trans – Creates a Transformation after Import. A Transformation is a data-processing object that combines input objects, applies processing logic, and produces a reusable Data Warehouse (DWH) result for downstream work.
- Hist – Requests Historization, the documented flow from an IMP object in the Staging Layer (IMP) to an STG object in the Persisted Staging Layer (STG). Use it when the required design includes history handling; STG identifies the Persisted Staging Layer (STG), not a required schema name.
- Dimension – Creates a Dimension: descriptive business data prepared for analytical use, such as customer attributes.
- Fact – Creates a Fact Transformation. A Fact represents measurable business events, balances, or transactions prepared for analytical use, such as sales amounts. Select it according to the intended reporting design.
Choose by the required result: if the approved requirement includes historical versions, Hist is the history-related option; if it includes descriptive reporting objects, Dimension is the dimension option. Determine the complete required combination before changing the row. Do not infer automatic dependencies between checkboxes from this page.
Clicking a classification column's header toggles all its checkboxes. Use individual row cells when configuring Sources separately. Use a header only when you intend to apply its toggle to every row, then review the result.
Data Vault alternatives: these additional columns apply to a DataVault 2.0 design.
- Auto – DataVault 2.0 only: the wizard automatically creates a Hub and Satellite or a Link. Review each Source's classification before proceeding.
- Hub/Sat – DataVault 2.0 only: explicitly requests a Hub and Satellite. Sat abbreviates Satellite.
- Link – DataVault 2.0 only: requests a Link. Use this for the approved relationship design, not simply because several columns look like keys.
SAP alternatives: if present, obtain these values from the approved extraction configuration.
- Update Mode – SAP DeltaQ and ODP only: selects the Source's update mode. Obtain the value from the SAP extraction configuration.
- DQ Log.Sys – SAP DeltaQ only: the logical-system setting. DQ refers to DeltaQ here. Use the value from the configured SAP landscape.
- DQ RFC dest – SAP DeltaQ only: the configured SAP destination identified by the DQ RFC dest field. Use the destination from the approved SAP extraction setup. Use the configured destination identifier; do not derive it from the field label.
- Auto sync. – SAP DeltaQ and ODP only: automatic synchronization setting. Confirm its intended behavior for the extraction configuration before changing it.
Classification example: if a Source requires only an import definition, Import is the relevant choice; do not add other classifications merely because they appear in the screenshot. If the requirement includes history, review Hist and the complete required combination. This example does not establish automatic dependencies between the classification settings.
Screenshot example: the pictured Categories row has Import and Hist checked. Both the row name and those selections illustrate one configuration. Do not select or clear a classification solely to reproduce that image.
Review and configure naming settings
Click Next to open the wizard's naming page. Stay inside DWH Wizard; this is not the separate Help → DWH settings dialog, which maintains common Data Warehouse (DWH) naming fields.
A. Understand the placeholders before editing
A naming template combines literal text with placeholders in braces. Preserve the spelling and case of each supported placeholder. Use only the supported placeholders for each naming field, as explained below.
- {CONNECTOR_NAME} – The selected Connector's name, such as Northwind in the example.
- {SRC_SCHEMA} – The source schema, such as dbo. Preserve the spelling and braces of the complete placeholder
{SRC_SCHEMA}. - {SRC_NAME} – The Source object's name, such as Categories.
- {SRC_FRIENDLY_NAME} – The Source's readable friendly name. Confirm that a friendly name is defined before relying on it in a naming template.
- {NR} – The numbering placeholder used in package naming templates. Do not assume a particular starting number or duplicate-name behavior; review the final package names and numbering.
- {TableName}, {ColumnName}, {LINK_NAME} – Field-specific placeholders used in the key, calendar-in-facts, and Link Satellite templates. Do not replace them with uppercase SRC placeholders or assume all placeholders work in every field.
B. Review the fields relevant to your selected objects
- Tables per package – Number of tables included in each generated package. A package groups processing work. For example, 10 is a grouping value; it does not guarantee an exact final package count. Use the grouping size required by your project.
- Import Package names – Template for generated import-package names. For example,
IMP_{CONNECTOR_NAME}{NR}combines a literal prefix with the Connector name and a numbering placeholder. - Historizing Package names – Template for generated Historization-package names. For example,
HIST_{CONNECTOR_NAME}{NR}combines the literal prefixHIST_with the Connector name and a numbering placeholder. - Table names – Template for generated table names. For example,
{SRC_NAME}uses the Source object's name. - Transformation names – Template for generated Transformation names. For example,
{SRC_NAME}_Vadds the literal suffix_V. - Dimension names – Template for generated Dimension names. For example,
DIM_{SRC_NAME}adds the literal prefixDIM_. - Fact names – Template for generated Fact names. For example,
FACT_{SRC_NAME}adds the literal prefixFACT_. - HUB / SAT / LINK package name – Templates for Data Vault Hub, Satellite, and Link packages. HUB, SAT, and LINK identify those object categories. Review these fields when the corresponding Data Vault packages are required.
- HUB / SAT / LINK transformation name – Templates for the corresponding Data Vault Transformation names. Examples are
{SRC_NAME}_HUB,{SRC_NAME}_SAT, and{SRC_NAME}_LINK. - HUB / SAT / LINK table name – Templates for the corresponding Data Vault table names, which can use the literal suffixes
_HUB,_SAT, and_LINK. - LINKSAT table name – Name template for a Link Satellite, for example,
{LINK_NAME}SAT. LINKSAT means Link Satellite; review this field when that object is required. - Key field name – Naming template for key fields, for example,
FK_{TableName}.FK_is the literal prefix in this example, while{TableName}is the placeholder. The prefix alone does not establish a key’s type or behavior. Preserve the documented placeholder spelling and case. - Calendar in facts name – Calendar-related field naming template for facts, for example,
FK_{TableName}_{ColumnName}. Do not treat this field as the calendar dimension's name or its date range.
Layer terms versus naming text: Source Layer (SRC) and Transformation Layer (TRN) identify layers. In the examples below, SRC_ and TRN_ are literal naming prefixes, not instructions to select or change a layer. Keep supported placeholders such as {SRC_NAME} intact.
C. Set and check the relevant naming values
In Tables per package, enter the grouping size required by your project. In the naming fields for the object types selected in Classify each selected Source, enter or retain templates that follow your approved naming convention. Use the supported placeholders described above and check how each template combines with your actual Source names. Leave settings for unrelated object types unchanged.
Naming examples: the following changes demonstrate literal prefixes, placeholders, and grouping values. Categories, dbo, and the numbers are illustrative; neither the original nor the replacement values are required for this task.
| Setting | Illustrative change | Naming effect or check |
|---|---|---|
| Table names | Replace {SRC_NAME} with SRC_{SRC_NAME}. | For Source Categories, the template becomes SRC_Categories. SRC_ is literal text you chose, not a new placeholder. Use this only if that is the approved naming convention. |
| Transformation names | Replace {SRC_NAME}_V with TRN_{SRC_NAME}. | For a Source named Categories, the template becomes TRN_Categories when a Transformation is requested. Apply this type of change only when it matches the naming convention for the Transformation you intend to create. |
| Dimension names | Replace DIM_{SRC_NAME} with DIM_{SRC_SCHEMA}_{SRC_NAME}. | For dbo.Categories, the template becomes DIM_dbo_Categories when a Dimension is requested. This can distinguish same-named objects in different source schemas. |
| Tables per package | For example, change 10 to 5 when five tables per package matches your design. | Changes the configured number of tables per generated package. Do not promise an exact package name or count without checking generation. |
Before Next: check for empty required names, unsupported placeholders, unintended prefixes, and names that would conflict with existing objects. Confirm that your actual Source names produce the intended names under the chosen templates. The table’s values are examples, not a required configuration.
Configure generation settings and target schemas
Click Next to open the generation settings page. Review each applicable setting in the groups below; no example value is a required default.
A. Field names, relationships, and date dimensions
- Field names appearance — No changes / Upper case / Lower case – Preserves source-field casing, converts generated field names to uppercase, or converts them to lowercase. For example, CustomerCode becomes CUSTOMERCODE with Upper case.
- Retrieve relations – Asks the wizard to retrieve relationships from the source database. This is an attempt, not a guarantee that every required relationship is available or detected.
- Create Snapshot dimension – Requests creation of a snapshot dimension, used with snapshot-date reporting. It has no effect when that dimension already exists.
- Create Calendar dimension – Requests creation of a calendar dimension containing date-related attributes. It has no effect when that dimension already exists.
- Calendar dimension name – Name of the calendar dimension to create, for example,
DIM_Calendar. TheDIM_prefix is illustrative; use the name required by your project. - Calendar period – Start and end dates for the calendar dimension to create. Set both dates deliberately; the sample range is not a required business period.
Set Field names appearance to the casing required by your naming convention: No changes preserves source casing; Upper case or Lower case changes it as described above. Select Retrieve relations when the task requires the wizard to attempt to retrieve source relationships. Select Create Snapshot dimension or Create Calendar dimension only when the corresponding dimension is required; leave these checkboxes clear when you do not intend to request them.
If a calendar dimension is required, select Create Calendar dimension, enter the intended Calendar dimension name, and set both Calendar period endpoints to cover the dates needed by your project. Use the date controls or the format displayed by your interface. Date example: 1 January 2025 through 31 December 2027 illustrates a start and end date; it is not a required range. An already existing calendar dimension is not recreated by this option.
B. Related inputs for facts
- Include tables in facts — N:1 direct related – Includes tables directly related to the main table through many-to-one relationships. N:1 means many records can relate to one, such as many orders belonging to one customer.
- Include tables in facts — All direct related – Includes directly related tables without restricting the relationship to many-to-one.
- Include tables in facts — N:1 direct and indirect related – Includes many-to-one related tables reached directly or through other tables.
- Include tables in facts — All direct and indirect related – Includes both direct and indirect related tables without the many-to-one restriction. Review all included inputs before using the resulting Fact.
When Fact Transformations are requested, set Include tables in facts to the relationship scope required by the Fact design. Use the definitions above to choose between direct or indirect relationships and the many-to-one restriction. Leave this setting unchanged when no Fact is requested. Relationship example: N:1 direct related can include Customers for Orders when that relationship exists, but it includes all qualifying directly related tables—not necessarily Customers alone. These table names are illustrative, not required inputs.
C. SAP-only settings
- SAP DeltaQ transfer mode – SAP DeltaQ only: the transfer-mode labels are IDoc and tRFC. Use the mode required by the approved SAP configuration; neither is a universal recommendation.
- SAP description language – For SAP Sources, the language used to obtain table and field descriptions. Use the language code required by your SAP configuration.
For an SAP Source, set the applicable transfer mode and description language from the approved SAP configuration. For a non-SAP Source, these settings do not apply. Use the values required for your Source.
D. Friendly names and Predefined transformation rules
- Use friendly names in transformations as column names – Uses defined readable field names as Transformation column names when available. Clear it when technical Source names are required by downstream consumers.
- Default transformations — No defaults – Uses no Predefined transformation rules.
- Default transformations — All defaults – Uses all configured Predefined transformation rules. Select this only when every configured rule is intended.
- Default transformations — Selected defaults – Uses only the predefined rules selected in the list below.
- Default transformations list – The available and selected predefined rules. With Selected defaults, choose an existing rule and use the list's transfer control to select it. Inspect its saved definition before relying on its name.
- Trim – The documented example applies LTRIM(RTRIM(FieldName)) to varchar/nvarchar text fields, removing leading and trailing spaces. A customized project rule may differ; check its definition.
- NULL / NA / Str / XML in rule names – These are parts of configured rule names, not complete descriptions of their effects. Inspect the saved rule’s input conditions, expression, and intended result; do not infer an expansion, replacement value, or eligibility from its name.
- Other predefined-rule names – StringNULLToNA, StringMaxTo8000, NumberNULLToZero, XmlToString, HierarchyToString, TimeToDatetime, BinaryToStr, and Anonymization are examples of configured rule names, not full specifications of their implementations.
Select Use friendly names in transformations as column names when defined friendly names are required for the generated columns; clear it when technical names are required. For Default transformations, choose No defaults when no predefined rules are required, Selected defaults when only particular existing rules are required, or All defaults only when every configured rule is intended. Inspect each rule’s saved definition before choosing it; a rule name alone does not establish its effect.
If you need selected rules: select Selected defaults, select the required existing rule in the left Default transformations list, and click its >> transfer button. Confirm that the rule appears in the right list. This is the transfer button on the generation settings page, not the first screen's down arrow.
E. Stars and target schemas
- Stars – The list of Stars for which Facts and Dimensions are to be created. A Star groups a Fact with related Dimensions. The right-hand list contains the selected entries.
- Schemas for the generated objects – Target schema selectors for Import tables, Import transformations, Historicized tables, and Facts and dimensions. A schema groups target objects; these selections do not change the source Schema filter.
When Facts and Dimensions are to be created for particular Stars, select the required entries in the left Stars list and use that area’s >> control to move them to the selected list on the right. Confirm that the right list contains only the intended Stars. To remove an unintended selection, select it in the right list and use the Stars area’s << control. This removes it from the run’s selection, not from the project. If no Star assignment is required, leave the selected list empty.
For each object type you intend to generate, select its approved target schema under Schemas for the generated objects. Schema examples: the table below explains example target-schema assignments; IMP, STG, and DWH are not required schema names.
| Setting | Example value | Explanation |
|---|---|---|
| Import tables | IMP | Target schema for the Import table definition. |
| Import transformations | IMP | Target schema for generated import Transformations. |
| Historicized tables | STG | Target schema for historized tables when Hist is requested. |
| Facts and dimensions | DWH | Target schema for facts and dimensions when requested. |
Use these sample schema values only where they match your development Data Warehouse (DWH) project; do not rename existing schemas to reproduce an example. Record the selected target schemas together with the relevant naming templates so that you can check the generated definitions against your intended configuration.
Review the configuration and finish
Use Back to review earlier pages if needed, then return with Next. Before clicking Finish, check:
4.12.1. The intended Connector and Read metadata from connector mode were used for the metadata read.
4.12.2. Only the intended Source rows are in the classification list. Any row marked Exist in DWH is an approved refresh.
4.12.3. The architecture and each Source’s classification combination match the definitions required by the approved design.
4.12.4. Naming templates and target schemas agree with your naming convention. Check the expected names using the actual Sources selected, not the names in the screenshots.
4.12.5. Relationship retrieval, snapshot/calendar dimensions, predefined rules, and Star assignments match the intended outputs; no setting is selected merely because it appears in an image.
Click Finish. Allow the wizard to complete. If an error is reported, inspect it and check the resulting state before retrying; do not treat clicking the button or closing the window as proof of success.
Expected Results: the wizard completes the draft Data Warehouse (DWH) definitions for the selected Sources and classifications. These steps do not instruct you to run import packages, load Source rows, or validate production results.
Expected Results
Check the intended Sources
Open the toolbar's Sources → Sources list. Find each intended object using its Connector, source Schema, and Source name. Match these values to the objects you selected, not to the example names in the screenshots.
Compare Source metadata
Open the Source entry and compare its metadata with the actual source definition: column names and data types should match the object you intended to read. Do not edit fields merely to make them match a screenshot.
Check requested Import definitions
If you requested Import, open ETL → Imports and double-click the import entry for the selected Source. The ETL tab opens these processing workflows, and the Imports list shows Import package items. Check the Source and target against your plan; do not require an import entry solely because one is pictured.
Check generated names and target schemas
For the definitions you requested, compare the generated names and target schemas with the naming templates and schema selections reviewed in Review and configure naming settings through Review the configuration and finish. If an import package was generated, check its name against the chosen template. Where the template uses {NR}, do not assume a particular package number. No pictured object name or schema is a success criterion.
Check classifications and generation settings
Check that no unintended classifications or extra generation settings were applied. If refreshing an existing Source, compare the resulting definitions with the expected refresh scope.
Check errors and the task boundary
Record any generation or validation errors. Package execution, database deployment where required, row counts, and data-quality checks belong to a separate approved loading and validation workflow.
Do not verify by blindly rerunning the wizard: do not assume that reopening restores every previous wizard selection. An existing Source may be refreshed. Check the resulting objects rather than assuming the previous selection state was saved as a reusable session.
Decisions and variations
6.1 Metadata mode. These steps read external metadata. To reuse stored definitions instead, follow Use existing Source metadata with DWH Wizard.
6.2 Architecture and classifications. Choose the Data Warehouse (DWH) architecture in Choose the Data Warehouse (DWH) architecture before configuring the classifications in Classify each selected Source.
6.3 SAP settings. Configure SAP-specific settings only for an SAP Connector. Use the extraction values required by that Source; these settings do not apply to non-SAP Connectors.
6.4 Generated definitions. Configure naming and generation settings for the object types you intend to create. Screenshot selections and example values do not determine which definitions your Data Warehouse (DWH) project requires.
Troubleshooting
- Expected object or control is missing — Check the current project, object identity, and interface version against the steps.
- Result differs from the design — Review the saved configuration and generated expression, then test representative inputs in the approved development workflow.
