
Save and load a Data Warehouse (DWH) project folder
Introduction
Save a Data Warehouse (DWH) project to a folder so that you can load its configuration into AnalyticsCreator later. The Save project and Load project commands export and import the project configuration as a structured set of files.
This how-to explains how to select a destination folder, load a saved project folder, and check that the intended configuration is available. Use your own project and folder names; Northwind, Downloads, and the other names and values in the screenshots are examples.
Applicability
Use this workflow in AnalyticsCreator Desktop for the Save project and Load project commands in the Project group on the File ribbon. Both commands use a folder picker.
The Save to file, Load from file, Save to cloud, and Load from cloud commands belong to the separate Backup and Restore group. Their workflows are outside the scope of this page.
Prerequisites
3.1. AnalyticsCreator Desktop with the Save project and Load project commands available on the File ribbon.
3.2. For saving: the Data Warehouse (DWH) project to export is open, and a destination location is available where you can write the project files.
3.3. For loading: an accessible project folder created with Save project, and knowledge of which saved copy and project configuration you intend to load.
Steps
To save a project, follow Start saving the project and Select the destination folder and save. To load an existing saved folder, start at Start loading a saved project, including the check for current work you need to preserve.
Start saving the project
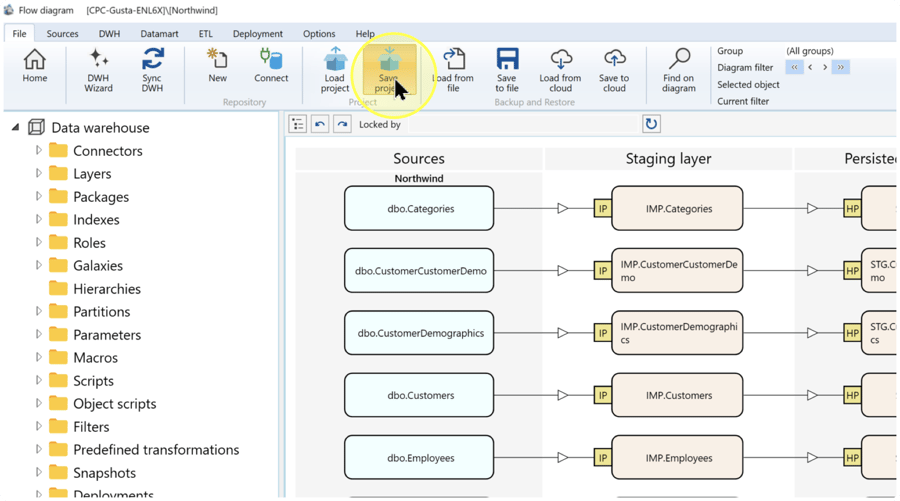
Check the project identity in the AnalyticsCreator window title to confirm that the intended Data Warehouse (DWH) project is open. Select the File tab, then click Save project in the Project group.
Save project exports the project configuration to a folder. Use this command for the folder workflow; the nearby Save to file button starts a separate backup action.
Select the destination folder and save
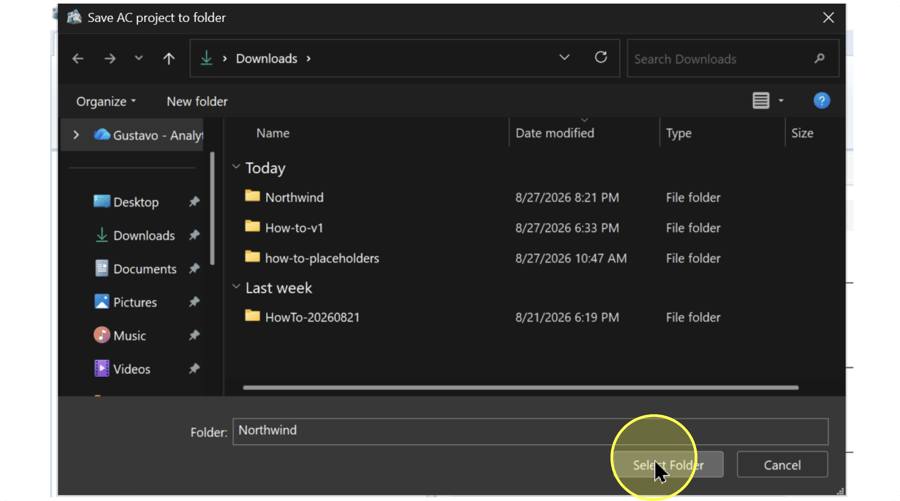
In Save AC project to folder, navigate to the location where you want to save the project and select its destination folder. The Folder: field identifies the folder to confirm.
If you need to preserve an earlier saved copy, select a different folder. To create a separate destination, click New folder, enter a descriptive name, and select that folder. If you intend to update an existing saved copy, select its folder only after checking that it is the copy you want to update.
Check the location and the Folder: field, then click Select Folder to start saving. If the destination is incorrect and you want to leave without saving, click Cancel.
After the operation finishes, open the selected folder in Windows File Explorer and check that project files were created or updated. Record the folder location so that you can select the same saved copy when loading. If AnalyticsCreator reports an error, resolve the reported issue before treating the copy as saved.
Start loading a saved project
If the current project contains work you need to preserve, save it to a separate folder using Start saving the project and Select the destination folder and save before loading another copy. Keep the folder you intend to load separate from the folder used to preserve current work.
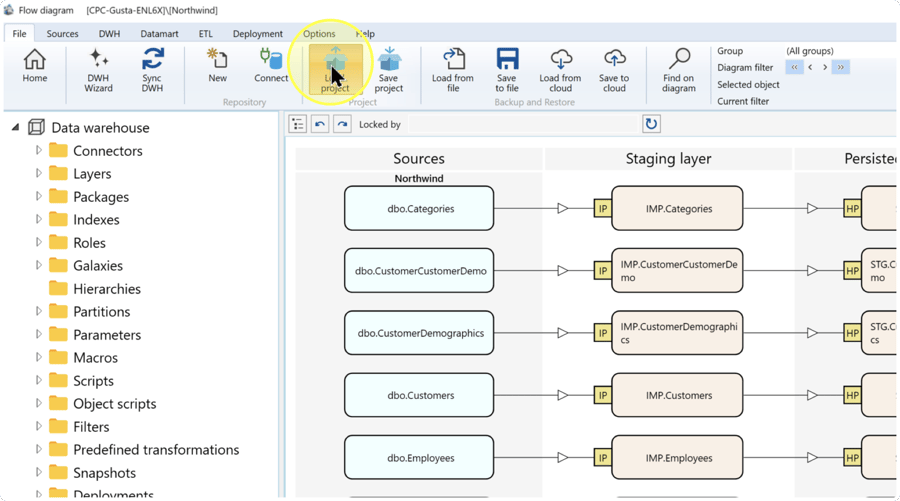
Select the File tab, then click Load project in the Project group. Load project imports a configuration saved with Save project; use it for a saved project folder rather than the separate Load from file backup command.
Select the saved folder and check the loaded project
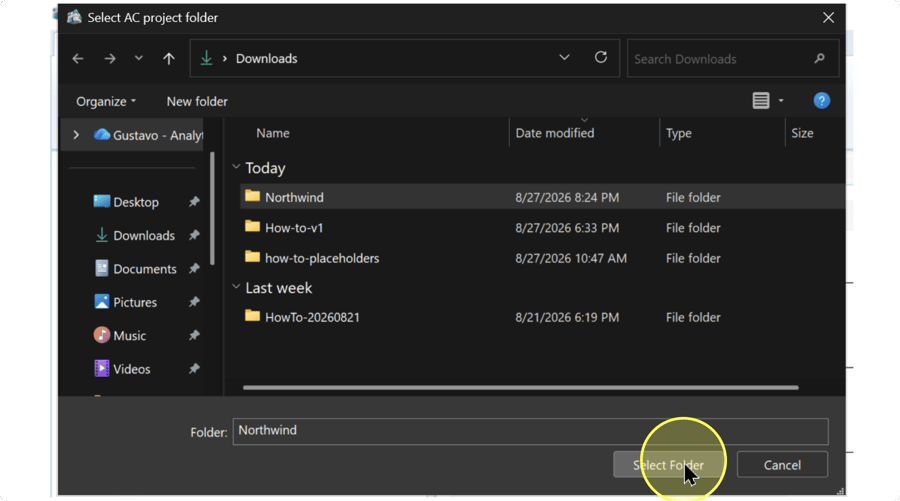
In Select AC project folder, navigate to the saved copy you intend to load. Select the project folder created by Save project, then check the location and the Folder: field. Choose the project folder itself, rather than its parent folder or an individual file inside it.
For example, the screenshot selects Northwind within Downloads. In that example, Northwind is the project folder; Downloads is only its parent location. Your project can use a different folder name and location.
Click Select Folder to start loading the selected project. If you cannot identify the intended saved copy, click Cancel and confirm its location before trying again.
After loading finishes, check the project identity in the window title. Use the navigation tree or flow diagram to locate objects expected in the saved copy, then open their definitions and compare names and settings with the intended configuration. Keep the earlier saved copy until these checks are complete. See Expected Results for the Expected Results.
Expected Results
5.1. After saving, the selected destination contains the exported project files. Confirm the location and check that the files reflect the save you just performed. The presence of files alone does not verify that the intended configuration can be loaded.
5.2. After loading, the intended Data Warehouse (DWH) project configuration is available in AnalyticsCreator. Verify the project identity and representative object definitions against the saved copy you selected.
These checks establish the saved and loaded project configuration. They do not verify execution, deployment, or the contents of physical Data Warehouse (DWH) tables.
Decisions and variations
- Save, load, or both — Use Start saving the project through Select the destination folder and save to save and Start loading a saved project through Select the saved folder and check the loaded project to load. Loading an existing saved copy does not require exporting it again first; preserve current work when needed as described in Start loading a saved project.
- Preserve an earlier copy or update it — Choose a different destination folder to keep an earlier copy. Select an existing saved folder only when you intend to update that copy, as explained in Select the destination folder and save.
- Project folder or backup file — Use Save project and Load project for the folder format. The commands in Backup and Restore are separate workflows; see File.
Troubleshooting
- Expected item is missing — Check the project identity and the folder selected in Select the saved folder and check the loaded project. Use the navigation tree to check the relevant object definition. If you selected the wrong saved copy, identify the correct project folder and repeat Start loading a saved project through Select the saved folder and check the loaded project after preserving any current work.
- A change is not retained — Confirm that you saved the intended project after making the change and loaded that same folder. Check any message from the save operation. Save the intended configuration again using Start saving the project through Select the destination folder and save, then check the destination before loading it.
