

English
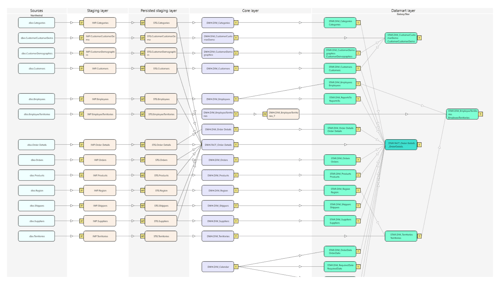
There are at least two different approaches to design a holistic business and data model.
The bottom-up method, which is shown in the graphic below and the top-down method, which starts with the conceptual model first, although models can also be loaded from other modeling tools.
.png?width=500&height=258&name=image%20(9).png)
- Connect AnalyticsCreator to any data source, especially databases, individual files, data lakes, cloud services, Excel files and other extracts. Build-in connectors to many common sources are available as well as support of Azure Data Factory, Azure Analytics.
- Define Data - AnalyticsCreator extracts all metadata from the data sources, such as field descriptions, data types, key fields, and all relationships, which is stored in the AnalyticsCreator Metadata Repository. This will:
- Extract and capture DDL
- Detect structure changes and forward in all higher layers.
- Cognitive Suggestion- Intelligent wizards help to create a draft version of the model across all layers of the data analytics platform. Choose different modelling approaches or create your own approach:
- Data Vault 2.0, dimensional, 3 NF, own
- Historical data handling (SCD, Snapshot, CDC, Gapless, ..)
- Use Azure DevOps
- Model- The entire toolset of AnalyticsCreator is at your disposal to further develop the draft model. Behind the holistic graphical model, the generated code is already finished and can be also modified manually, including:
- Automated transformations and wizards
- Collaboration
- Development process supported by data lineage flow-chart
- Own scripting and macros are possible
- Deploy - To deploy the Data model in different environments (Test, Prod, ..), AnalyticsCreator generates deployment packages that are also used for the change process of structures and loadings. Deployment packages can be used locally, in Fabric, Azure as well in hybrid environments. This includes:
- Stored procedures, SSIS
- Azure SQL DB, Azure Analysis Services, Synapse
- ARM Template for Azure Data Factory
- Tabular Models, OLAP Cubes
- Power BI
- Tableau
- Qlik
To ensure optimal performance, verify that the following requirements are met:
- Networking:
- Communication over Port 443 is where analytics communicates to the sAnalyticsCreator server.
- Operating System: Windows 10 or later.
AnalyticsCreator is compatible with Windows operating systems starting from version 10.
It is used for data transfers and ensures that data exchanged between a web browser and websites remains encrypted and protected from unauthorized access.
- Microsoft SQL Server:
- SQL Server on Azure Virtual Machines
- Azure SQL Managed Instances

- Microsoft Fabric SQL: Microsoft Fabric SQL Icon
- On Premises:
Supported editions include Express, Standard, and Enterprise from Microsoft SQL Server 2016 onward.
AnalyticsCreator utilizes SQL Server to store project data, so it is essential to have a compatible version installed before continuing.
Compatibility Matrix
| VERSION | Edition | EngineEdition |
|---|---|---|
| Microsoft SQL Azure (RTM) | SQL Azure | 12 |
To check your version use
SELECT VERSION = @@VERSION,
       Edition = SERVERPROPERTY('Edition'),
       EngineEdition = SERVERPROPERTY('EngineEdition')
Configuring AnalyticsCreator
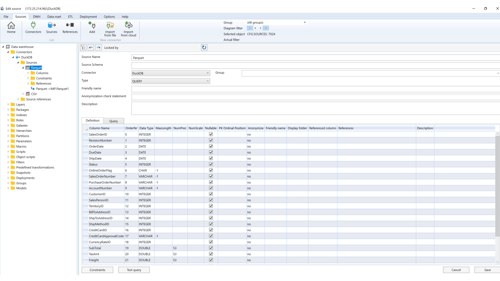
The source contains a description of the external data.
Each source belongs to a connector.
Each source has columns, and references (Table Keys) between sources can be defined.
To open the source definition, use the "Edit source" option from the source context menu in the navigation tree or diagram.
To add a new source, use the "Add new source" option from the source context menu in the navigation tree or diagram.
Below is a typical source definition:

The properties of sources depend on the connector type and the source type.
There are three source types:
- TABLE
- VIEW
- SAP_DELTAQ
- QUERY
For the QUERY source type, the source window will display an additional tab containing the query definition. You cannot create a source manually. The only source that can be created manually is the CSV
Tables in AnalyticsCreator
A table represents a database table or view within the data warehouse, and each table belongs to a specific schema. Tables are created automatically when defining a data import, historization, or persisting process.
Views are created when defining a transformation. Additionally, tables can be manually created to store results of external or script transformations.
For most tables, several properties can be configured, including calculated columns, primary keys, identity columns, and indexes.
Table Properties:
- Table name: table name
- Table schema: table schema
- Table type: type of the table
- Import table: Filled by external data using SSIS package.
- Historicized table: Contains historized data. Includes:
SATZ_ID (bigint)– surrogate primary keyDAT_VON_HIST (datetime)– start of validityDAT_BIS_HIST (datetime)– end of validity
- View without history
- View with history
- Persisted table without history
- Persisted table with history
- Data mart dimension view without history
- Data mart dimension view with history
- Data mart fact view without history
- Data mart fact view with history
- Externally filled table without history
- Externally filled table with history
- Data vault hub table with history
- Data vault satellite table with history
- Data vault link table with history
- Friendly name: Used in OLAP cubes instead of table name.
- Compression type: DEFAULT, NONE, ROW, PAGE
- Description: Description inherited by dependent objects.
- Hist of table: Names of persist, hub, satellite, or link tables.
- Has primary key: If checked, adds PRIMARY KEY constraint.
- Primary key name: Name of the primary key.
- PK clustered: If checked, creates clustered PK.
- Columns:
- Column name
- Data type, MaxLength, NumPrec, NumScale, Nullable
- PKOrdinalPos
- Default (e.g., GETDATE())
- Friendly name
- Referenced column (for N:1 relationships)
- References (read-only, comma-separated list)
- Identity column:
- Name, type, seed, increment
- PK pos: Position in PK
For normal tables (not views), you can optionally define identity and calculated columns (see tab).

Calculated Columns Properties:
- Column name: Name of the column
- Statement: SQL statement (macros like
@GetVaultHashsupported) - Persisted: If checked, column will be persisted
- PKOrdinalPos: Position in primary key
- Friendly name: Used in OLAP cubes instead of column name
- Referenced column: Defines N:1 references
- References: Comma-separated, read-only
Defining Table Relationships in AnalyticsCreator
Relationships between tables can be defined to enable combining tables during transformations. These relationships include N:1 ("1-field" to "1-primary key field") references and more complex associations.
Defining N:1 References
One-Field to One Primary Key Field:
These references can be directly defined within the table definition using the Referenced Column attribute.
- Example: A foreign key in one table referencing the primary key of another.
More complex references can be defined using Table references.
Here is a typical table reference definition:

Table Reference Properties:
- Cardinality:
- Unknown
- OneToOne
- ManyToOne
- OneToMany
- ManyToMany
Note: It is recommended to primarily use Many-to-One (N:1) and One-to-Many (1:N) cardinalities.
- Join: SQL join type
- Table1: Schema and table name of the first table
- Table2: Schema and table name of the second table
- Alias 1: Optional. Alias of the first table. Should be defined if reference statement is used
- Alias 2: Optional. Alias of the second table. Should be defined if reference statement is used
- Description: Reference name
- Auto created: If checked, the reference was automatically created during synchronization.
- Reference statement: Optional. SQL reference statement. Should be used if the reference cannot be described using column references only. Table aliases will be used.
- Columns: There are columns and statements. Either column or statement should be defined on each reference side.
- Column1: Column from the first table
- Statement1: SQL statement
- Column2: Column from the second table
- Statement2: SQL statement
Inheritance of Table Relations Across DWH Layers
Table relations will be inherited into subsequent DWH layers. For example, if references are defined between two import tables that are historicized, the same references will be automatically created between the corresponding historicized tables.
If a reference is changed, the changes will propagate into the inherited references unless those references are used in transformations. In such cases, the references will be renamed by adding the suffix _changed(N), and new inherited references will be created.
Therefore, if a "parent" reference is changed, transformations using the inherited reference will not be updated automatically. However, you can manually update them by selecting the new inherited reference.
The inherited references, where the Auto created flag is set, cannot be modified unless you uncheck the Auto created flag.
A transformation is a process used to modify data. The result of a transformation is always either a single VIEW or a single TABLE.
To create a new transformation, use the Transformation Wizard.
Each transformation has the following common properties:
- Name: The name of the transformation
- Schema: The schema for the transformation
- TransType: The type of transformation
- Stars: A list of stars in which the transformation is involved
- Star: The name of the star
- IsFact: This should be selected for fact transformations
- Filter: You can define an additional filter to restrict transformation data for a specific data mart
AnalyticsCreator supports the following transformation types:
- Regular transformation
- Manual transformation
- External transformation
- Script transformation
- Data mart transformation
- Predefined transformation
Regular Transformation
A regular transformation is a VIEW generated by AnalyticsCreator based on the defined transformation parameters. Tables, table relationships, and transformation columns must be specified, after which AnalyticsCreator automatically creates the transformation VIEW.
Below is a typical regular transformation definition:

Regular Transformation Properties:
- Historization type: Defines how to work with historicized data.
- FullHist: Fully historicized transformation. Includes:
SATZ_IDDAT_VON_HISTDAT_BIS_HIST
- SnapshotHist: For predefined snapshot dates (used for dimensions).
- Snapshot: Uses snapshot dates to combine historicized data (usually for facts).
- ActualOnly: Uses only current data from historized sources (dimensions or facts).
- None: Non-historicized data.
- FullHist: Fully historicized transformation. Includes:
- Create unknown member: Adds surrogate ID = 0 with default values for unmatched dimension members.
- Fact transformation: Check if defining a fact transformation.
- Persist table: Name of the table where results will be stored.
- Persist package: Name of the SSIS package for persisting results.
- SSIS Package: For external or script transformations; launches transformation.
- Hub of table: Read-only source for hub transformations.
- Sat of table: Source table for satellite transformations.
- Link of table: Read-only source table for link transformations.
- Snapshots: Snapshot and group info (relevant for
Snapshottypes). - Tables: Participating tables
- SeqNr: Unique table sequence number
- Table: Table name
- Table Alias: Unique alias used in joins/statements
- JoinHistType:
- None – no historicized data
- Actual – only current data
- Historical_from – value at start of linked record period
- Historical_to – value at end of linked record period
- Full – full historicizing info
- Join type: INNER, LEFT, RIGHT, FULL, CROSS
- Force Join: LOOP JOIN, HASH JOIN, MERGE JOIN
- Reference statement: Optional custom join logic (e.g.
T5.ID = T1.CustomerID)
- Filter statement: Additional SQL filter (e.g.
T5.Country = 'GER') - Sub select: Additional subquery to refine reference logic.
- Columns: Transformation output columns
- Column name
- TableSeqNr (optional)
- Reference (optional)
- Statement: SQL with aliases
- IsAggr: Aggregated column
- Default value: Used for unknown members
- SeqNr: Column sequence
- PK Position: Primary key position
- Description
- References: Table joins (see Table References)
- SeqNr1: First table seq number
- SeqNr2: Second table seq number
- Reference: Reference name
- Predefined transformations: List of referenced transformations
- VIEW tab: Read-only view definition
Transformation Compilation and Creation
- Compile: Use the
Compilebutton to check and validate the transformation logic. Errors will be flagged. - Create: Use the
Createbutton to build the transformation VIEW into the DWH. Errors will be reported if present.
Manual Transformation
A manual transformation is a VIEW that is created manually.
Properties:
- VIEW: Contains the manually created VIEW definition.
- Rename Columns Table: If you rename a column in the manually created VIEW, enter the old and new column names into this table.
Below is a typical manual transformation definition:

External Transformation
An external transformation is a transformation manually created using an SSIS package.
Properties:
- Result Table: The table where the transformation results will be stored.
- SSIS Package: The name of the manually created SSIS package.
- Tables: A list of tables on which the transformation depends. Only the table name is relevant.
Below is a typical external transformation definition:

Script Transformation
A script transformation is a transformation that uses an SQL script.
Properties:
- Result Table: The table where the transformation results will be stored.
- SSIS Package: The name of the SSIS package where the transformation script is executed.
- Script: The SQL script used in the transformation.
Below is a typical script transformation definition:
Data Mart Transformation
Data mart transformations are views created in the data mart layer. A data mart transformation cannot be created manually. Instead, the Stars – the affiliation of other transformations – must be defined, and the corresponding data mart transformations will be created automatically.

Every regular or manual transformation can be persisted. This means the content of the VIEW can be stored in a TABLE.
Predefined Transformations
Predefined transformations are field-level transformations based on the field type. For example, below is a definition of a predefined transformation that removes leading and trailing spaces from all fields of type varchar and nvarchar:

Check and Transformation Statements
The Check Statement is used to verify whether a field meets the transformation conditions.
The Transformation Statement contains the actual SQL transformation logic.
Several predefined transformations are built-in, but users can also create their own. Predefined transformations are applied in regular transformations. When creating a transformation, users can select which predefined transformations to apply.
List of Predefined Transformations
| Predefined Transformation | Description |
|---|---|
| Trim | Removes leading and trailing spaces from string fields (e.g., varchar, nvarchar). |
| StringNULLToNA | Converts NULL values in string fields to "NA". |
| StringMaxT08000 | Trims string fields to a maximum length of 8000 characters. |
| NumberNULLToZero | Converts NULL values in numeric fields to zero. |
| XmlToString | Converts XML data type fields to string format. |
| HierarchyToString | Converts hierarchical data into a string representation. |
| TimeToDatetime | Converts time fields into datetime by appending a default date (e.g., "1900-01-01"). |
| BinaryToStr | Converts binary data to a string format. |
| Anonymization | Anonymizes data by replacing sensitive fields with generic or masked values. |
Applying Multiple Predefined Transformations
Multiple predefined transformations can be applied simultaneously. Below is an example result when combining multiple transformations on a single field:
[FKART] = RTRIM(LTRIM(ISNULL([T1].[FKART], 'N.A.')))Snapshots and Snapshot Groups
Snapshots are predefined dates calculated during the ETL process and used in Snapshot Transformations to combine historicized data.
By default, there is always at least one snapshot, referred to as the "Actual Date", which represents the current timestamp. Additional snapshots can be defined as needed.
Below is a typical snapshot definition:

SQL Expression for Calculating the Previous Date
This SQL expression calculates the previous date relative to a given @ActDate. It uses the DATEADD, CONVERT, and DATEPART functions to adjust the date by subtracting days and converting between data types.
DATEADD(ms, -2, CONVERT(datetime, CONVERT(date, DATEADD(dd, 1-DATEPART(d, @ActDate), @ActDate))))Each snapshot must have a unique name. An SQL statement is used to calculate the snapshot value, and the predefined variable @ActDate (representing the current timestamp) can be used in this statement.
Multiple snapshots can be organized into snapshot groups for better management and usability, as shown below:

Working with Multiple Snapshots
When working with multiple snapshots, a Snapshot Dimension can be defined and used as a common dimension in the data mart layer.
To create a Snapshot Dimension, use the context menu:
Right-click over the Core Layer → Add → Snapshot Dimension

Snapshots are used in regular snapshot transformations to combine historicized data based on predefined dates. These transformations rely on snapshot values to accurately represent the historical context of the data.

Using Snapshot Groups and Individual Snapshots
Both snapshot groups and individual snapshots can be selected and applied during the transformation process.

Snapshot Transformation Wizard
To create a snapshot transformation, select "Add → Snapshot Dimension" from the diagram context menu. This will open the Snapshot Transformation Wizard.
⚠️ Note: Only one snapshot dimension can exist in the data warehouse.
As shown in the image below:

Parameters
- Schema
The schema in which the snapshot transformation resides. - Name
The name assigned to the snapshot transformation. - Stars
The data mart stars where this snapshot transformation will be included.
Time Transformation Wizard
To create a time transformation, select "Add → Time Dimension" from the diagram context menu.
As shown in the image below:

The Time Transformation Wizard will then open, allowing you to configure a new time transformation:

Parameters
- Schema
The schema in which the time transformation resides. - Name
The name assigned to the time transformation. - Period (Minutes)
The interval (in minutes) used to generate time dimension records. - Time-to-ID Function
The macro function that converts aDateTimevalue into the key value for the time dimension.
Use case: Convertdatetimefields in fact transformations into time dimension members. - Stars
The data mart stars where the time transformation will be included.
Calendar Transformation Wizard
To create a calendar transformation, select "Add → Calendar Dimension" from the diagram context menu.
As shown in the image below:

The Calendar Transformation Wizard will open. Typically, only one calendar transformation is required in the data warehouse.
As shown in the image below:

Parameters
- Schema: The schema of the calendar transformation.
- Name: The name of the calendar transformation.
- Date From: The start date for the calendar.
- Date To: The end date for the calendar.
- Date-to-ID Function: The macro name that transforms a
DateTimevalue into the key value for the calendar dimension. This macro is typically used in fact transformations to mapdatetimefields to calendar dimension members. - Stars: The data mart stars where the calendar transformation will be included.
Persisting Wizard
The content of any regular or manual transformation can be stored in a table, typically to improve access speed for complex transformations. Persisting the transformation is managed through an SSIS package.
To persist a transformation, the user should select "Add → Persisting" from the object context menu in the diagram.
As shown in the image below:

Persisting Wizard Options
As shown in the image below:
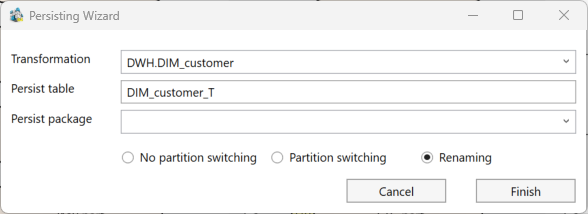
- Transformation: The name of the transformation to persist.
- Persist Table: The name of the table where the transformation will be persisted. This table will be created in the same schema as the transformation.
- Persist Package: The name of the SSIS package that manages the persistence process.
Transformation Wizard
The Transformation Wizard is used to create a new transformation. To start it, use the object context menu and select: "Add → Transformation" in the diagram.

Typical Transformation Wizard Window

Supported Transformation Types
- Regular Transformations: Described in tabular form, results in a generated
VIEW. - Manual Transformations: Hand-created
VIEWs defined manually by the user. - Script Transformations: Based on SQL scripts, often calling stored procedures.
- External Transformations: Created outside AnalyticsCreator as SSIS packages.
Main Page Parameters
- Type: Transformation type:
- Dimension: FullHist, creates unknown member, JoinHistType: Actual
- Fact: Snapshot, no unknown member, JoinHistType: Historical_to
- Other: FullHist, no unknown member, JoinHistType: Historical_to
- Manual, External, Script: as named
- Schema: Schema name
- Name: Transformation name
- Historizing Type:
- FullHist
- SnapshotHist
- Snapshot
- ActualOnly
- None
- Main Table: Only for regular transformations
- Create Unknown Member: Adds surrogate ID = 0 (for dimensions)
- Persist Transformation: Save
VIEWto a table - Persist Table: Name of persist table
- Persist Package: SSIS package name
- Result Table: For external/script types
- SSIS Package: For external/script types
Table Selection Page
Allows selection of additional tables. Tables must be directly or indirectly related to the main table.

Parameters
- Table JoinHistType
- None
- Actual
- Historical_from
- Historical_to
- Full
- Join Options:
- All N:1 direct related
- All direct related
- All N:1 related
- All related
- Use hash keys if available
Parameter Page
Configure additional parameters (for regular transformations only).

- Fields:
- None
- All key fields
- All fields
- Field Names (if duplicated):
- Field[n]
- Table_Field
- Field Name Appearance:
- No changes
- Upper case
- Lower case
- Key Fields NULL to Zero: Replaces
NULLwith0 - Use Friendly Names as Column Names
Stars Page

- Stars: Data mart stars for the transformation
- Default Transformations:
- No Defaults (facts)
- All Defaults (dimensions)
- Selected Defaults
- Dependent Tables: Manage dependent tables

Script Page
Used for script transformations. Enter the SQL logic that defines the transformation.

INSERT INTO IMP.LastPayment(BusinessEntityID, RateChangeDate, Rate)
SELECT
    PH.BusinessEntityID, PH.RateChangeDate, PH.Rate
FROM
(
    SELECT
        BusinessEntityID,
        MAX(RateChangeDate) LastRateChangeDate
    FROM
        [IMP].[EmployeePayHistory]
    GROUP BY
        BusinessEntityID
) T
INNER JOIN [IMP].[EmployeePayHistory] PH ON
    PH.BusinessEntityID = T.BusinessEntityID AND
    PH.RateChangeDate = T.LastRateChangeDate
Historization wizard
The Historization Wizard is used to historicize a table or transformation.
To start the Historization Wizard, use the object context menu: "Add" → "Historization" in the diagram, as shown in the image below:

Alternatively, the object context menu in the navigation tree can be used, as shown in the image below:

Parameters
There is a typical Historization Wizard window, as shown in the image below:

- Source Table: The table that should be historicized.
- Target Schema: The schema of the historicized table.
- Target Name: The name of the historicized table.
- Package: The name of the SSIS package where the historization will be done. You can select an existing historization package or add a new package name.
- Historizing Type: You can select between SSIS package and stored procedure.
- SCD Type: The user can select between different historization types: SCD 0, SCD 1, and SCD 2.
- Empty Record Behavior: Defines what should happen in case of a missing source record.
- Use VAULT ID as PK: If you are using DataVault or mixed architecture, the user can use HashKeys instead of business keys to perform historization.
After clicking "Finish", the historization will be generated, and the diagram will be updated automatically. Then, the user can select the generated historization package and optionally change some package properties (see "Historizing Package").
Import Wizard
To start the Import Wizard, use the source context menu:

Import Status Indicators
Sources marked with a "!" icon indicate that they have not yet been imported. Attempting to launch the Import Wizard on a source that has already been imported will result in an error.

Typical Import Wizard Window
There is a typical Import Wizard window, as shown in the image below:

Options:
- Source: The source that should be imported.
- Target Schema: The schema of the import table.
- Target Name: The name of the import table.
- Package: The name of the SSIS package where the import will be done. You can select an existing import package or add a new package name.
Click Finish to proceed. The import definition window will open, allowing the configuration of additional import attributes and parameters, as shown in the image below:

Post-Import Actions
Refer to the "Import Package" description for more details.
After creating a new import, refresh the diagram to reflect the changes, as shown in the image below:

Source Wizard
The Source Wizard is used to add new data sources to the repository. To launch the Source Wizard, right-click on the "Sources" branch of a connector in the context menu and select "Add Source."

Source Wizard Functionality
The appearance and functionality of the Source Wizard will vary depending on the selected source type (Table or Query):
- Table: When selecting Table as the data source, the wizard provides options to configure and view available tables.

Configuring a Table Data Source
When selecting "Table" as the data source in the Source Wizard, click the "Apply" button to display the list of available source tables. Optionally, you can enter a schema or table filter to refine the results.
Configuration Options:
- Retrieve Relations: Enables the retrieval of relationships for the selected source table, if available.
- SAP Description Language: Specifies the language for object descriptions when working with SAP sources.
- SAP DeltaQ Attributes: For SAP DeltaQ sources, additional DeltaQ-specific attributes must be defined.
Configuring a Query as a Data Source
When selecting "Query" as the data source in the Source Wizard, follow these steps:

- Define Schema and Name: Specify the schema and name of the source for the repository.
- Enter the Query: Provide the query in the query language supported by the data source.
- Test the Query: Click the “Test Query” button to verify its validity and ensure it retrieves the expected results.
- Complete the Configuration: Click the “Finish” button to add the new source to the repository. The source definition window will open, allowing further modifications if needed.
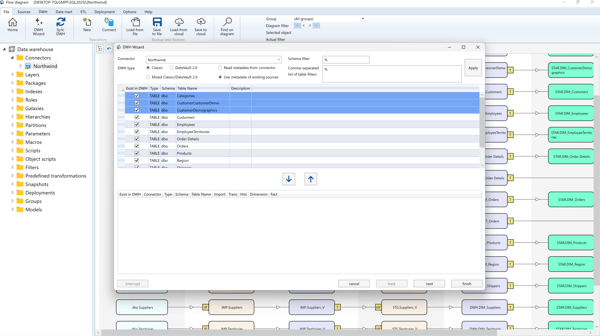
DWH Wizard
The DWH Wizard allows for the rapid creation of a semi-ready data warehouse. It is especially effective when the data source includes predefined table references or manually maintained source references.
Prerequisites
- At least one source connector must be defined before using the DWH Wizard.
- Note: The DWH Wizard does not support CSV connectors. For CSV sources, use the Source Wizard instead.
To launch the DWH Wizard, click the “DWH Wizard” button in the toolbar.
Instead, the user can use the connector context menu:

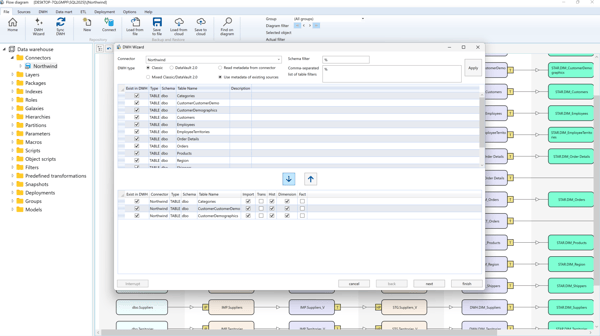
Using the DWH Wizard
Select the connector, optionally enter the schema or table filter, and click "Apply". Then, the source tables will be displayed.
Optionally, select the "Existing Sources" radio button to work with already defined sources instead of querying the external system (ideal for meta connectors).
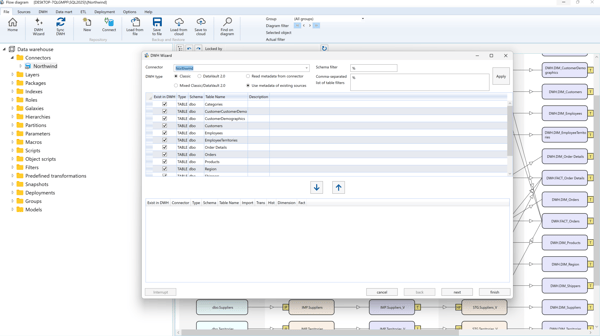
If a table already exists, the "Exist" checkbox will be selected.
To add or remove tables:
- Select them and click the ➕ button to add.
- Select from below and click the ➖ button to remove.
DWH Wizard Architecture Options
The wizard can generate the DWH using:
- Classic or Mixed Architecture: Supports imports, historization, dimensions, and facts.
- Data Vault Architecture: Supports hubs, satellites, links, dimensions, and facts with automatic classification when “Auto” is selected.
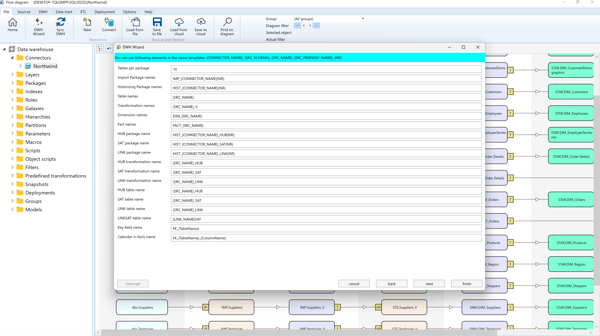
Define name templates for DWH objects:
Set additional parameters:
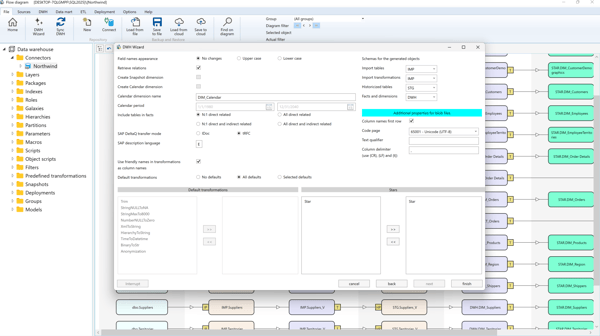
DWH Wizard Properties
- Field Name Appearance: Leave unchanged, or convert to UPPER/lowercase.
- Retrieve Relations: Enable automatic relation detection from source metadata.
- Create Calendar Dimension: Auto-create calendar dimension and define date range.
- Include Tables in Facts: Include related tables in facts (N:1, indirect, etc.).
- Use Calendar in Facts: Include date-to-calendar references in fact transformations.
- SAP DeltaQ Transfer Mode: Choose between IDoc or tRFS.
- SAP DeltaQ Automatic Synchronization: Enable automatic DeltaQ sync.
- SAP Description Language: Select SAP object description language.
- DataVault2: Do Not Create HUBs: Optionally suppress hub creation in DV2.
- Historizing Type: Choose SSIS package or stored procedure for historization.
- Use Friendly Names in Transformations as Column Names: Use display names from SAP/meta/manual connectors.
- Default Transformations: Select default predefined transformations for dimensions.
- Stars: Assign generated dimensions and facts to data mart stars.
Deployment Packages
Multiple deployment packages can be created to manage different deployment configurations. Each deployment package is a Visual Studio solution containing the necessary elements required to deploy the data warehouse.

Deployment Package Properties
- Name: The name of the deployment package and the generated Visual Studio solution.
- Create DACPAC: If checked, the DACPAC file containing the DWH structure will be generated.
- Deploy DACPAC: If checked, the DACPAC file will be deployed to the database defined below.
- Server, DB Name, Integrated Security, Login, and Password: Connection attributes of SQL Server to which the DACPAC file should be deployed.
- Deployment Options:
- Allow Data Loss
- Drop Objects Not in Source
- Backup DB Before Changes
- Block When Drift Detected
- Deploy in Single User Mode
- Allow Incompatible Platform
These options control how the DACPAC is deployed. See SQLDEPLOY.EXE options for more information.
- Create Power Pivot: If checked, the Excel file containing the Power Pivot/Power BI semantic model will be created. This Power Pivot file can be imported into Power BI.
Next options are common for Multidimensional and Tabular OLAP databases:
- Create XMLA File: If checked, the XMLA file containing the OLAP database definition will be created.
- Server, DB Name, Login, Password: Connection attributes of the OLAP server where the OLAP database will be deployed. Dummy information can be added here, but the XMLA file should be edited to replace it with the correct server credentials.
- Process Cube in Workflow Package: If checked, the cube processing task will be added to the workflow package.
- Create Cube During Deployment: If checked, the OLAP cube will be created using the OLAP server connection attributes.
- SSIS Packages: SSIS packages that will be generated during deployment. To invert the selection, click on the header of the "Deploy" column in the package list.
- SSIS Config Type: Choose between an environment variable and a config file to configure the connection to the database containing the
[CFG].[SSIS_Configuration]table. This table holds the configurations for all SSIS packages. - SSIS Config Env. Var./SSIS Config File Path: The name of the environment variable or the path to the config file that will be created.
- Deploy SSIS_Configuration: If checked, the content of the
[CFG].[SSIS_Configuration]table will be recreated. - Use Project Reference: If selected, the workflow package will access other SSIS packages using a project reference. Otherwise, it will use a file reference.
- Other Files:
- Generate Power BI Project (.PBIP) files
- Generate Tableau Packaged Workbook (.twbx)
- Generate Qlik Script (.qvs)
Historization Package
This package is used to historicize data. One package can be used to define multiple historizations.
Note:
Historicizing Data refers to the process of tracking and storing changes to data over time. Instead of just storing the current state of the data, historicizing data ensures that previous versions or states are preserved. This allows organizations to analyze how data has evolved, which is useful for trend analysis, auditing, and reporting.
Below is a typical historization definition:
Historization Options
- Missing record behavior: Describes the behavior when a primary key is missing in the source table:
- Close: Closes the validity period of the corresponding key in the historicized table.
- Add empty record: Closes the period and adds a new record with default "Empty value" columns.
- Do not close: No action is taken; the key remains in the actual data.
- Insert only: If set, the source data is appended without historization (used when no primary key exists).
- Type: Selects the historization algorithm:
- SSIS Package: Historization is done via an SSIS package.
- Automatically created stored procedure: Procedure named
[CFG].[HIST_TableName]is generated and executed. - Manually created stored procedure: Procedure with same name is manually editable. Use auto-generated procedure as a starting point.
- Optional statement to calculate ValidFrom date: Define a custom SQL expression (returns
dateordatetime) to calculate the validity start date for new/existing keys. - Insert Filter and Delete Filter:
- Insert Filter: Restrict which source records get historicized.
- Delete Filter: Restrict which records can be "closed" when primary keys are missing.
- SCD Type: Choose historization logic per field:
- None (SCD 0): No change tracking; current value only.
- SCD 1: Changes overwrite historical values.
- SCD 2: Adds new records for changed values, maintaining validity periods.
- Calculated columns: Define derived columns using previous (
[S]) and current ([I]) values, e.g.:ISNULL(I.Amount, 0) - ISNULL(S.Amount, 0) - SSIS variables: Use
@VariableNameformat to reference variables for filters. Define values via[CFG].[SSIS_Configuration]. - Scripts: Define pre- or post-historization SQL scripts using the Scripts tab.
Import Package
This package is used to import data from external data sources.
A single package can be used to define multiple imports.
Below is a typical import definition:
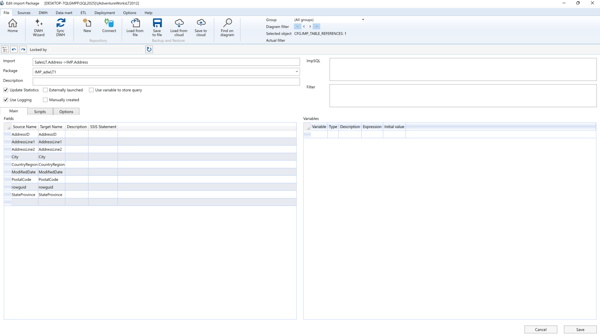
Import Package Properties
- Fields: Defines the mapping between source and target fields, including any SSIS expressions used for each field during import.
- SSIS Variables: Allows defining SSIS variables and their value expressions. Values can be managed using the
SSIS_Configurationtable. These variables are commonly used in filter expressions. - Filter: Filters restrict the data imported. Use SSIS variables with the “@” symbol (e.g.,
@Date) to build dynamic filter logic. - Scripts (Tab): SQL scripts can be configured to run before or after the import process.
- ImpSQL: Allows redefining the default SQL command used for data import (used when custom logic is required).
- Update Statistics: If selected, the SQL Server
UPDATE STATISTICScommand is executed after the import completes. - Manually Created: Indicates that the SSIS package is custom-built or modified. When selected:
- The package will not be auto-generated during deployment.
- However, it will be included in the overall workflow package execution.
- Use Logging: Enables execution logs to be written to the DWH log tables, improving monitoring and traceability.
- Externally Launched: Excludes the package from the main workflow execution. It must be triggered manually outside of the workflow.
Parameters
AnalyticsCreator provides various parameters that can be modified to customize its functionality. To access the parameter settings page, navigate to Help → Parameters in the toolbar.
Once the parameter settings page is open, use the Search Criteria field to locate specific parameters.
.png?width=500&height=199&name=image%20(39).png)
Below is a list of parameters available for modification in AnalyticsCreator:
| Parameter | Description | Initial value |
|---|---|---|
| ALLOW_SNOWFLAKE_TABULAR_OLAP | Allow DIM-DIM relations in tabular OLAP cubes | 0 |
| AUTOCREATED_REFERENCES_USE_FRIENDLY_NAME | Use friendly names instead of table names in description of autocreated references: 0- no, 1 - yes | 0 |
| CSV_EMPTY_STRING_LENGTH | Length of empty string fields | 50 |
| CSV_MIN_STRING_LENGTH | Minimum length of string fields | 50 |
| CSV_SCAN_ROWS | Count of rows scanned to get the field properties | 500 |
| DATAVAULT2_CREATE_HUBS | DataVault2 create hubs: 0 - no, 1 - yes | 1 |
| DEFAULT_CALENDAR_MACRO | Name of default calendar macro | NULL |
| DEPLOYMENT_DO_NOT_DROP_OBJECT_TYPES | Comma-separated list of object types (see description of SQLPACKAGE.EXE) |
Aggregates, ApplicationRoles, Assemblies, AsymmetricKeys, BrokerPriorities, Certificates, Contracts, DatabaseRoles, DatabaseTriggers, ExtendedProperties, FullTextCatalogs, FullTextStoplists, MessageTypes, PartitionFunctions, PartitionSchemes, Permissions, Queues, RemoteServiceBindings, RoleMembership, Rules, SearchPropertyLists, Sequences, Services, Signatures, SymmetricKeys, Synonyms, UserDefinedDataTypes, UserDefinedTableTypes, ClrUserDefinedTypes, Users, XmlSchemaCollections, Audits, Credentials, CryptographicProviders, DatabaseAuditSpecifications, Endpoints, ErrorMessages, EventNotifications, EventSessions, LinkedServerLogins, LinkedServers, Logins, Routes, ServerAuditSpecifications, ServerRoleMembership, ServerRoles, ServerTriggers |
| DESCRIPTION_PATTERN_CALENDAR_ID | Autogenerated description of HIST_ID (SATZ_ID) field in calendar dimension. You can use {TableName}, {TableID} and {CR} placeholders | Calendar ID |
| DESCRIPTION_PATTERN_DATEFROM | Autogenerated description of DATEFROM (DAT_VON_HIST) field. You can use {TableName}, {FriendlyName}, {TableID} and {CR} placeholders | {TableName}: Start of validity period |
| DESCRIPTION_PATTERN_DATETO | Autogenerated description of DATETO (DAT_BIS_HIST) field. You can use {TableName}, {FriendlyName}, {TableID} and {CR} placeholders | {TableName}: End of validity period |
| DESCRIPTION_PATTERN_HIST_ID | Autogenerated description of HIST_ID (SATZ_ID) field. You can use {TableName}, {FriendlyName}, {TableID} and {CR} placeholders | {TableName}: Surrogate key |
| DESCRIPTION_PATTERN_SNAPSHOT_ID | Autogenerated description of HIST_ID (SATZ_ID) field in snapshot dimension . You can use {TableName}, {TableID} and {CR} placeholders | Snapshot ID |
| DIAGRAM_NAME_PATTERN | Object name in diagram. You can use {Name}, {Friendly name}, {FullFriendlyName}, {ID} and {CR} placeholders | {FullFriendlyName} |
| DWH_CREATE_REFERENCES | Create disabled references between tables in data warehouse | 0 |
| DWHWIZARD_CALENDAR | DWH Wizard. 1 - Create, 0 - Do not create | 1 |
| DWHWIZARD_CALENDAR_FROM | DWH Wizard. Calendar start date | 19800101 |
| DWHWIZARD_CALENDAR_TO | DWH Wizard. Calendar start date | 20201231 |
| DWHWIZARD_CALENDAR_TRANSNAME | DWH Wizard. Calendar dimension name | DIM_Calendar |
| DWHWIZARD_DIMNAME | DWH Wizard. Template for generated dimensions | DIM_{SRC_NAME} |
| DWHWIZARD_DWHTYPE | DWH Wizard. 1 - Classic, 2 - DataVault 1.0, 3 - DataVault 2.0, 4 - Mixed | 1 |
| DWHWIZARD_FACT | DWH Wizard. 1 - N:1 direct related, 2 - All direct related, 3 - N:1 direct and indirect related, 4 - all direct and indirect related | 3 |
| DWHWIZARD_FACT_CALENDAR | DWH Wizard. 1 - use Calendar in facts, 0 - do not use Calendar in facts | 1 |
| DWHWIZARD_FACTNAME | DWH Wizard. Template for generated facts | FACT_{SRC_NAME} |
| DWHWIZARD_HISTPACKAGENAME | DWH Wizard. Template for generated hist package names | HIST_{CONNECTOR_NAME}{NR} |
| DWHWIZARD_HUB_PACKAGENAME | DWH Wizard. Template for generated HUB packages | HIST_{CONNECTOR_NAME}_HUB{NR} |
| DWHWIZARD_HUB_TABLENAME | DWH Wizard. Template for generated HUB tables | {SRC_NAME}_HUB |
| DWHWIZARD_HUB_TRANSNAME | DWH Wizard. Template for generated HUB transformations | {SRC_NAME}_HUB |
| DWHWIZARD_IMPPACKAGENAME | DWH Wizard. Template for generated import package names | IMP_{CONNECTOR_NAME}{NR} |
| DWHWIZARD_LINK_PACKAGENAME | DWH Wizard. Template for generated LINK packages | HIST_{CONNECTOR_NAME}_LINK{NR} |
| DWHWIZARD_LINK_TABLENAME | DWH Wizard. Template for generated LINK tables | {SRC_NAME}_LINK |
| DWHWIZARD_LINK_TRANSNAME | DWH Wizard. Template for generated LINK transformations | {SRC_NAME}_LINK |
| DWHWIZARD_SAT_PACKAGENAME | DWH Wizard. Template for generated SAT packages | HIST_{CONNECTOR_NAME}_SAT{NR} |
| DWHWIZARD_SAT_TABLENAME | DWH Wizard. Template for generated SAT tables | {SRC_NAME}_SAT |
| DWHWIZARD_SAT_TRANSNAME | DWH Wizard. Template for generated SAT transformations | {SRC_NAME}_SAT |
| DWHWIZARD_TABLENAME | DWH Wizard. Template for generated table names | {SRC_NAME} |
| DWHWIZARD_TABLESPERPACKAGE | DWH Wizard. Tables per package | 10 |
| FORCE_DESCRIPTION_INHERITANCE | Force inheritance of table and column description: 0 - no, 1 - yes | 0 |
| FORCE_FRIENDLYNAMES_INHERITANCE | Force inheritance of table and column friendly names: 0 - no, 1 - yes | 0 |
| FRIENDLYNAME_PATTERN_CALENDAR_ID | Autogenerated friendly name of HIST_ID (SATZ_ID) field in calendar dimension. You can use {TableName}, {TableID} and {CR} placeholders | Calendar |
| FRIENDLYNAME_PATTERN_DATEFROM | Autogenerated friendly name of DATEFROM (DAT_VON_HIST) field. You can use {TableName}, {FriendlyName}, {TableID} and {CR} placeholders | {FriendlyName}_ValidFrom |
| FRIENDLYNAME_PATTERN_DATETO | Autogenerated friendly name of DATETO (DAT_BIS_HIST) field. You can use {TableName}, {FriendlyName}, {TableID} and {CR} placeholders | {FriendlyName}_ValidTo |
| FRIENDLYNAME_PATTERN_DUPLICATED_COLUMNS | Autogenerated replacement of duplicated friendly names. You can use {FriendlyName}, {ColumnName}, {ColumnID} and {NR} (consecutive number) placeholders | {FriendlyName}_{ColumnName} |
| FRIENDLYNAME_PATTERN_DUPLICATED_TABLES | Autogenerated replacement of duplicated friendly names. You can use {FriendlyName}, {TableName}, {TableID} and {NR} (consecutive number) placeholders | {FriendlyName}_{TableName} |
| FRIENDLYNAME_PATTERN_HIST_ID | Autogenerated friendly name of HIST_ID (SATZ_ID) field. You can use {TableName}, {FriendlyName}, {TableID} and {CR} placeholders | {FriendlyName} |
| FRIENDLYNAME_PATTERN_SNAPSHOT_ID | Autogenerated friendly name of HIST_ID (SATZ_ID) field in snapshot dimension . You can use {TableName}, {TableID} and {CR} placeholders | Snapshot |
| HIST_DEFAULT_TYPE | 1- SSIS Package, 2 - Stored Procedure | 1 |
| HIST_DEFAULT_USE_VAULTID | 0 - don't use VAULT_HUB_ID as primary key. 1 - use VAULT_HUB_ID as primary key | 1 |
| HIST_DO_NOT_CLOSE | Default value of "Missing record behaviour" parameter for new historizations. 0 - close, 1 - don't close | 0 |
| LAYER1_NAME | Source layer name | Source layer |
| LAYER2_NAME | Staging layer name | Staging layer |
| LAYER3_NAME | Persisted staging layer name | Persisted staging layer |
| LAYER4_NAME | Transformation layer name | Transformation layer |
| LAYER5_NAME | Data warehouse layer name | Data warehouse layer |
| LAYER6_NAME | Data mart layer name | Data mart layer |
| OLEDBPROVIDER_SQLSERVER | OLEDB provider for SQL Server | SQLNCLI11 |
| REF_TABLES_RECURSION_DEPTH | Max recursion depth due the detection of referenced tables in transformation wizard | 5 |
| SAP_DELTAQ_AUTOSYNC | 0-Disable, 1- Enable | 1 |
| SAP_DELTAQ_TRANSFERMODE | I-IDoc, T- tRFC | T |
| SAP_DESCRIPTION_LANGUAGE | SAP language to get table and field descriptions | E |
| SAP_MAX_RECORD_COUNT | Max count of records returned by SAP | 1000 |
| SAP_THEOBALD_VERSION | 0 - match the SQL Server version, number (2008, 2012 etc) | 2012 |
| SAP_USETABLECOMPRESSION | Load SAP using compression | 1 |
| SHOW_HUB_DEPS | Show vault HUB dependencies | 0 |
| SOURCE_REFERENCE_DESCRIPTION_PATTERN | Autogenerated source reference description. You can use {SourceSchema1}, {SourceName1}, {SourceID1}, {FriendlyName1}, {SourceSchema2}, {SourceName2}, {SourceID2} and {FriendlyName2} placeholders | FK_{SourceName1}_{SourceName2} |
| SOURCE_REFERENCE_ONECOL_DESCRIPTION_PATTERN | Autogenerated one-column source reference description. You can use {SourceSchema1}, {SourceName1}, {SourceID1}, {FriendlyName1}, {SourceSchema2}, {SourceName2}, {SourceID2}, {FriendlyName2}, {ColumnName}, {ColumnID} and {ColumnFriendlyName} placeholders | RC_{SourceName1}_{SourceName2}_{ColumnName} |
| SOURCE_REFRESH_DEL_MISSING_IMP_COLS | Source refresh - delete missing import columns: 0 - no, 1 - yes | 0 |
| SOURCE_REFRESH_DEL_MISSING_SOURCES | Source refresh - delete missing sources: 0 - no, 1 - yes | 0 |
| SOURCE_REFRESH_REFRESH_IMP_COLS | Source refresh - refresh import columns: 0 - no, 1 - yes | 0 |
| SOURCE_REFRESH_REFRESH_IMP_DESC | Source refresh - refresh import descriptions: 0 - no, 1 - yes | 0 |
| SOURCE_REFRESH_REFRESH_PK | Source refresh - refresh primary keys in import tables: 0 - no, 1 - yes | 0 |
| SOURCE_REFRESH_REFRESH_SRC_DESC | Source refresh - refresh source descriptions: 0 - no, 1 - yes | 0 |
| SSIS_REPLACE_DECIMAL_SEPARATOR | 0 - do not replace, 1 - replace point by comma, 2 - replace comma by point | 1 |
| SYNC_TIMEOUT | Timeout for DWH synchronization, seconds | 600 |
| TABLE_COMPRESSION_TYPE | Default table compression type: 1-NONE, 2-PAGE, 3-RAW | 1 |
| TABLE_REFERENCE_DESCRIPTION_PATTERN | Autogenerated table reference description. You can use {TableSchema1}, {TableName1}, {TableID1}, {FriendlyName1}, {TableSchema2}, {TableName2}, {TableID2} and {FriendlyName2} placeholders | FK_{TableName1}_{TableName2} |
| TABLE_REFERENCE_ONECOL_DESCRIPTION_PATTERN | Autogenerated one-column table reference description. You can use {TableSchema1}, {TableName1}, {TableID1}, {FriendlyName1}, {TableSchema2}, {TableName2}, {TableID2}, {FriendlyName2}, {ColumnName}, {ColumnID} and {ColumnFriendlyName} placeholders | RC_{TableName1}_{TableName2}_{ColumnName} |
| THUMBNAIL_DIAGRAM_DOCK | 0 - No dock, 1 - Left top corner, 2 - Right top corner, 3 - Left down corner, 4 - Right down corner | 4 |
| THUMBNAIL_DIAGRAM_HEIGHT | Height (points) | 300 |
| THUMBNAIL_DIAGRAM_LEFT | Left (points) | 0 |
| THUMBNAIL_DIAGRAM_MARGIN | Margin (points). | 30 |
| THUMBNAIL_DIAGRAM_SHOW | 0 - do not show, 1 - show | 1 |
| THUMBNAIL_DIAGRAM_TOP | Top (points) | 0 |
| THUMBNAIL_DIAGRAM_WIDTH | Width (points) | 300 |
| TRANS_DEFAULT_USE_VAULT_RELATIONS | 0 - use business relations rather than VAULT relations. 1 - use VAULT relations rather than business relations | 1 |
| TRANS_FRIENDLY_NAMES_AS_COLUMN_NAMES | Use friendly names as column names in transformations: 0 - no, 1 - yes | 1 |
| TRANSFORMATIONS_CREATEVIEWS | Create VIEW when saving transformation: 2-yes, 1-compile only, 0-no | 0 |
Scripts
Scripts are a set of SQL commands that will be executed under specific conditions. There are four types of scripts:
- Pre-Deployment Script: This script is executed prior to DWH synchronization and before deployment.
- Post-Deployment Script: This script is executed after DWH synchronization and before deployment.
- Pre-Workflow Script: This script is executed in the workflow package before starting all other packages.
- Post-Workflow Script: This script is executed in the workflow package after all other packages have finished.
Deployment Script Control
The deployment script can be disabled during synchronization or deployment by using the "Do Not Deploy" and "Do Not Synchronize" flags.
Below is a typical script definition:

Pre and Post-Deployment Scripts for Stored Procedures
Pre and Post-deployment scripts can be used to create stored procedures for use in transformations. In this case, the script should be executed only during Data Warehouse (DWH) synchronization.
Including the CREATE PROCEDURE script during deployment is unnecessary, as the procedure definition is already included in the deployment package.
Macros
A macro is a powerful tool used to simplify transformation definitions in AnalyticsCreator. Every macro has the following components:
- Name: The name of the macro.
- Language: The programming language used in the macro.
- Definition Statement: The logic or functionality defined within the macro.
- Referenced Table (optional): Used for auto-referencing in transformations.
Currently, two languages are supported: T-SQL and SSIS.
- T-SQL Macros: Used in transformations, calculated fields, and database objects.
- SSIS Macros: Used in SSIS statements for import constraints or field logic.
Macro Example
A typical macro definition:

Macro Statement and Parameters
Every macro uses positional parameters like :1, :2, etc. To call a macro, prefix it with @ and supply parameters in parentheses. For example:
@Date2ID(T1.BUDAT)This will be parsed into:
CONVERT(bigint, ISNULL(DATEDIFF(DD, '20000101', CONVERT(date, T1.BUDAT)) + 1, 0))Macro Parameters and NULL Replacement
If fewer parameters are passed than defined, the remaining placeholders will be replaced by NULL.
@Date2ID()Results in:
CONVERT(bigint, ISNULL(DATEDIFF(DD, '20000101', CONVERT(date, NULL)) + 1, 0))Referenced Table Parameter
The Referenced Table parameter allows automatic creation of a reference between a field and the referenced table, based on the macro logic.
Macro Usage in Transformations
Macros are commonly used in transformation column definitions. For example:

This will be parsed in the transformation VIEW as:
[FK_ModifiedDate] = CASE
    WHEN T1.ModifiedDate < '19800101' THEN 0
    WHEN T1.ModifiedDate > '20401231' THEN CONVERT(bigint, DATEDIFF(DD, '19800101',  '20401231') + 1)
    ELSE CONVERT(bigint, ISNULL(DATEDIFF(DD, '19800101', CONVERT(date, T1.ModifiedDate)) + 1, 0))
Macro Updates
If a macro definition is changed, all dependent transformations and calculated fields will be recalculated automatically to reflect the change.
Roles
User Roles in OLAP Cubes
User roles are utilized in OLAP cubes to restrict access. Existing user roles can be viewed by using the "Data Mart → Roles" toolbar button or the "List Roles" context menu under the "Roles" node in the navigation tree.

Adding a New Role
To add a new role, click the "New" button in the role list window or use the "Add Role" context menu under the "Roles" node in the navigation tree.

Role List and Role Details Windows
These windows allow users to define, edit, and manage access permissions across OLAP cubes, dimensions, and users. They also provide tools for organizing and duplicating existing roles efficiently.

Role Options
For a full list of role definition options in SSAS, refer to SQL Server Analysis Services documentation.
- Name: The name of the role.
- Full Control: Grants full access to the cube.
- Read Sources: Allows reading of source data.
- Process Database: Allows cube processing.
- Read Source Definition: Allows reading of source metadata.
- Read Definition: Allows reading of the cube definition.
- Users: A list of logins that belong to the group.
- Cubes: A list of cubes that the role users have access to.
- Dimensions: A list of dimensions that the role users have access to.
- Cube Dimensions: A list of cube dimensions that the role users have access to.
Duplicating Roles
To duplicate an existing role, use the "Duplicate" context menu of the specific role.

Filter Diagram by Group
To display only the objects belonging to a specific group in the diagram, select the group from the "Group" dropdown in the menu bar.

Groups in Navigation Tree
In the navigation tree, the user can see the defined object groups:
.png?width=500&name=image%20(19).png)
There are different icons for common groups and workflow groups.
To edit a group, select "Edit Group" from the context menu.
.png?width=500&name=image%20(20).png)
You can edit the group definition as follows:
.png?width=500&name=image%20(21).png)
To view all objects belonging to a specific group, select "List Objects" from the group context menu.
.png?width=500&name=image%20(22).png)
Managing Objects in the Group
The user can view and edit the objects belonging to the selected group. In this window, the user can:
- Add new objects to the group
- Delete primary objects
- Exclude inherited objects from the group
As shown in the image below.
.png?width=500&name=image%20(23).png)
Object Membership
AnalyticsCreator objects, such as sources, tables, and transformations, can be organized into groups. These groups allow users to:
- Display only the objects belonging to a specific group.
- Enable or disable objects in the workflow based on their group membership.
To add an object to a group, select "Object Groups" from the object's context menu, as shown in the image below.
.png?width=500&name=image%20(16).png)
The Group Window will open, allowing you to manage group memberships.
.png?width=500&name=image%20(17).png)
Creating and Managing Groups
To create a new group, enter a group name and check the "Member" checkbox.
To add all objects dependent on the selected object to the group, select the "Inherit Successors" checkbox.
To add all objects that the selected object depends on to the group, select the "Inherit Predecessors" checkbox.
To create SQL scripts for turning group objects on and off in the workflow package, select the "Create Workflow" checkbox. Three SQL scripts can be created:
- SSIS_Configuration Complete Script: Contains the workflow configuration, disabling all objects except those that belong to the group.
- SSIS_Configuration Enable Script: Contains the workflow configuration, enabling objects that belong to the group.
- SSIS_Configuration Disable Script: Contains the workflow configuration, disabling objects that belong to the group.
There is the group membership of one object, as shown in the image below:
.png?width=500&name=image%20(18).png)
This object belongs to several groups. The "Inherited" flag indicates that the group membership was inherited from a dependent or depending object. This object is displayed in the "Inherited from Object" column.
To disable the "inherited" membership, select the "Exclude" checkbox.
Version Control in AnalyticsCreator
AnalyticsCreator supports version control by allowing users to export their repository into a structured JSON format. This enables seamless integration with Git-based systems such as GitHub or Azure DevOps, empowering teams to manage their data product development process with full traceability, collaboration, and control.
Why Use Version Control with AnalyticsCreator?
Version control brings critical benefits to your data warehouse development lifecycle:
- Track changes to your metadata and configurations
- Enable collaboration across multiple developers
- Revert to previous versions when needed
- Integrate with CI/CD pipelines
- Support consistent deployment and testing workflows
Exporting Your Repository
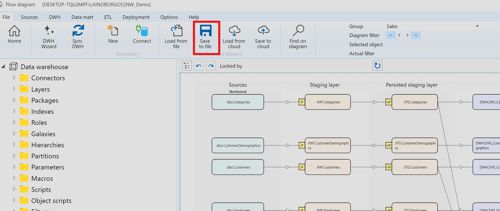
1. Export to File
In AnalyticsCreator, click:
File > Save to file
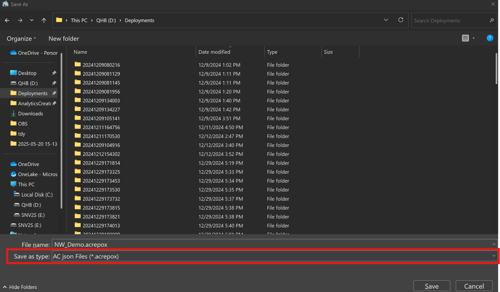
2. Choose Format: .acrepox
In the Save dialog, select the file type:
AC JSON Files (*.acrepox)
What's Included in the .acrepox File?
The exported file contains:
- Project metadata
- Data layers, ETL logic, and semantic models
- Parameters, transformations, macros
- Relationships and object dependencies
🔐 Credentials are NOT included. This ensures secure storage and prevents leaking sensitive information.
Step-by-Step: SQL Server Northwind Project
Create Your First Data Warehouse with AnalyticsCreator
AnalyticsCreator offers pre-configured demos for testing within your environment. This guide outlines the steps to transition from the Northwind OLTP database to the Northwind Data Warehouse model.
Once completed, you will have a fully generated DWH project ready to run locally.
Load the Demo Project
From the File menu, select Load From Cloud.
- Choose NW_Demo
- Enter a name for your new repository (default:
NW_Demo) - Note: This repository contains metadata only—no data is moved.
AnalyticsCreator will automatically generate all required project parameters.
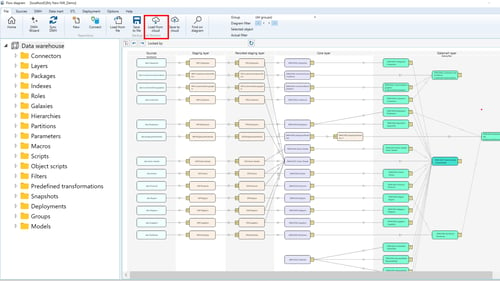
Project Structure: The 5-Layer Model
AnalyticsCreator will generate a Data Warehouse project with five layers:
- Sources – Raw data from the source system (Northwind OLTP).
- Staging Layer – Temporary storage for data cleansing and preparation.
- Persisted Staging Layer – Permanent storage of cleaned data for historization.
- Core Layer – Integrated business model—structured and optimized for querying.
- Datamart Layer – Optimized for reporting—organized by business topic (e.g., Sales, Inventory).
Northwind Setup (If Not Already Installed)
Step 1: Check if the Northwind Database Exists
Open SQL Server Management Studio (SSMS) and verify that the Northwind database is present.
If yes, skip to the next section. If not, proceed to Step 2.
Step 2: Create the Northwind Database
Run the setup script from Microsoft:
Or copy-paste it into SSMS and execute.
Step 3: Verify Database
USE Northwind;
GO
SELECT *
FROM INFORMATION_SCHEMA.TABLES
WHERE TABLE_SCHEMA = 'dbo'
  AND TABLE_TYPE = 'BASE TABLE';
Once confirmed, you can proceed with the next steps to configure the AnalyticsCreator Connector with your Northwind database.
Note: AnalyticsCreator uses only native Microsoft Connectors, and we do not store any personal information.
Step 4: Change Database Connector
Navigate to Sources > Connectors.
You will notice that a connector is already configured. For educational purposes, the connection string is not encrypted yet. To edit or add a new connection string, go to Options > Encrypted Strings > Add. Paste your connection string as demonstrated in the video below.
After adding the new connection string, it's time to test your connection. Go to Sources → Connectors and press the Test button to verify your connection.
Step 5: Create a New Deployment
In this step, you'll configure and deploy your project to the desired destination. Please note that only the metadata will be deployed; there will be no data movement or copy during this process.
- Navigate to Deployments in the menu and create a new deployment.
- Assign a name to your deployment.
- Configure the connection for the Destination
- Set the project path where the deployment will be saved.
- Select the packages you want to generate.
- Review the connection variables and click Deploy to initiate the process.
- Finally, click Deploy to complete the deployment.
In this step, your initial Data Warehouse project is created. Note that only the metadata—the structure of your project—is generated at this stage.
You can choose between two options for package generation:
SSIS follows a traditional ETL tool architecture, making it a suitable choice for on-premises data warehouse architectures. In contrast, ADF is designed with a modern cloud-native architecture, enabling seamless integration with various cloud services and big data systems.
This architectural distinction makes ADF a better fit for evolving data integration needs in cloud-based environments.
To execute your package and move your data, you will still need an Integration Runtime (IR). Keep in mind that AnalyticsCreator only generates the project at the metadata level and does not access your data outside the AnalyticsCreator interface. It does not link your data to us, ensuring that your data remains secure in its original location.
For testing purposes, you can run your package in Microsoft Visual Studio 2022, on your local SQL Server, or even in Azure Data Factory.