
Version Control
Version Control in AnalyticsCreator
AnalyticsCreator supports version control by allowing users to export their repository into a structured JSON format. This enables seamless integration with Git-based systems such as GitHub or Azure DevOps, empowering teams to manage their data product development process with full traceability, collaboration, and control.
Why Use Version Control with AnalyticsCreator?
Version control brings critical benefits to your data warehouse development lifecycle:
- Track changes to your metadata and configurations
- Enable collaboration across multiple developers
- Revert to previous versions when needed
- Integrate with CI/CD pipelines
- Support consistent deployment and testing workflows
Exporting Your Repository
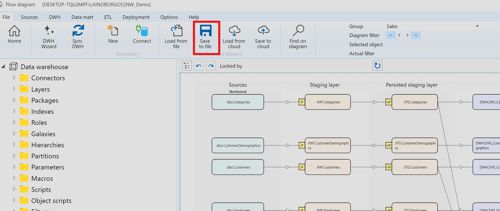
1. Export to File
In AnalyticsCreator, click:
File > Save to file
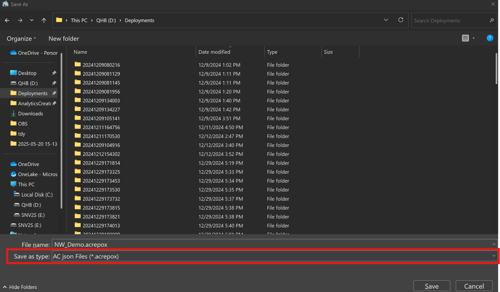
2. Choose Format: .acrepox
In the Save dialog, select the file type:
AC JSON Files (*.acrepox)
What's Included in the .acrepox File?
The exported file contains:
- Project metadata
- Data layers, ETL logic, and semantic models
- Parameters, transformations, macros
- Relationships and object dependencies
🔐 Credentials are NOT included. This ensures secure storage and prevents leaking sensitive information.
Implementing Version Control in a Collaborative Environment
To implement version control in a collaborative environment, use the Two-Branch Strategy:
main: Production-ready versionchanges: Development and staging updates
Prerequisites
- A Git repository (on GitHub, Azure DevOps, etc.)
- Git installed locally
- Access to the repository
- Your previously exported
.acrepoxfile
Step-by-Step Process
Step 1: Clone the Repository
git clone https://your-repo-url.git
cd your-repo-folder
Step 2: Switch to the changes Branch
git checkout -b changes
If changes already exists:
git checkout changes
Step 3: Add the Exported .acrepox File
Place your exported file (e.g., CustomerDW.acrepox) into the project folder. Then run:
git add CustomerDW.acrepox
git commit -m "Updated repository with latest model changes"
git push origin changes
Step 4: Open Pull Request (PR) to main
From GitHub or Azure DevOps:
- Go to the Pull Requests section.
- Create a new PR from
changes→main. - Include a clear description of what’s changed.
Review Checklist:
- Have you tested the export?
- Are credentials excluded?
- Have you added documentation for changes?
Step 5: Archive and Backup
Store previous versions of .acrepox files in a versions or archive folder within the repo for traceability, or use releases.
Best Practices
- Export regularly during development milestones
- Use folders to organize models by project/component
- Use tags or naming conventions for major releases
- Communicate changes clearly in PR descriptions
- Use secure CI/CD pipelines for automated deployment
Restoring a Version
To restore a specific version:
- Checkout the version or tag in Git
- Open the
.acrepoxfile in AnalyticsCreator:File > Open from file - Your full repository structure will be restored as exported.